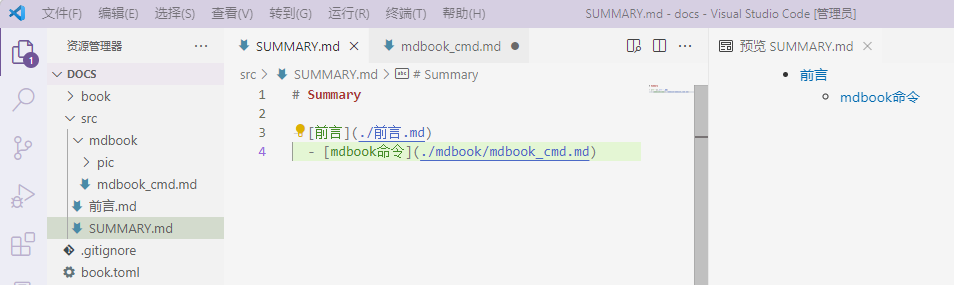
前言
这个是一个用于记录学习资料的博客,使用mdbook把markdown渲染成静态网页,使用github Actions流水线部署到Github Pages。
mdbook是真正的简单好用,最喜欢的功能是在SUMMARY.md内创建目录,会自动创建文件夹,而且SUMMARY.md可以使用//注释掉不想发布的页面。
因此第一篇文章将分享如何mdbook部署笔记。
交流可以到该项目提issue。
mdbook命令
mdbook的主要命令就是初始工程和启动服务。
init
> mdbook init -h
mdbook.exe-init v0.4.21
Creates the boilerplate structure and files for a new book

USAGE:
    mdbook.exe init [OPTIONS] [dir]

ARGS:
    <dir>    Directory to create the book in
             (Defaults to the Current Directory when omitted)

OPTIONS:
        --force              Skips confirmation prompts
    -h, --help               Print help information
        --ignore <ignore>    Creates a VCS ignore file (i.e. .gitignore) [possible values: none,
                             git]
        --theme              Copies the default theme into your source folder
        --title <title>      Sets the book title
    -V, --version            Print version information
serve
> mdbook serve -h
mdbook.exe-serve v0.4.21
Serves a book at http://localhost:3000, and rebuilds it on changes

USAGE:
    mdbook.exe serve [OPTIONS] [dir]

ARGS:
    <dir>    Root directory for the book
             (Defaults to the Current Directory when omitted)

OPTIONS:
    -d, --dest-dir <dest-dir>    Output directory for the book
                                 Relative paths are interpreted relative to the book's root
                                 directory.
                                 If omitted, mdBook uses build.build-dir from book.toml or defaults
                                 to `./book`.
    -h, --help                   Print help information
    -n, --hostname <hostname>    Hostname to listen on for HTTP connections [default: localhost]
    -o, --open                   Opens the compiled book in a web browser
    -p, --port <port>            Port to use for HTTP connections [default: 3000]
    -V, --version                Print version information
1.初始化工程
mkdir docs && cd docs
mdbook init . --title "my book"
2.启用服务,默认端口是3000,–open会自动打开默认浏览器。
mdbook serve . --open
3.现在可以通过在编辑src下的SUMMARY.md中新增章节,新增条目后,会自动创建文件,同时更新网页目录。
serve自动将markdown渲染输出到book目录,因此.gitignore文件的book,表示忽略book目录内的修改,防止触发build。
参考:https://rust-lang.github.io/mdBook/index.html
github pages
github pages 支持静态网页,我们需要把我们渲染后的mdbook上传到github pages仓库。虽然简单粗暴,但有几个完美主义者不能接受的缺点。
- 手动build渲染生成的静态网页再push,diff肯定会很多,看起来不舒服。
- 本地修改的markdown丢失,通过静态网页恢复很麻烦。
因此,我们需要CICD流水线帮助我们build & deploy,我们只管提交md源代码即可。 github的CICD工具很多,当然肯定是他们自亲儿子Actions最好,点击仓库中的Actions选项就能看到流水线。
gitlab里叫pipelines,github叫workflows,我们只需要在当前mdbook工程的 .github/workflows下创建yaml格式的流水线控制文件即可。
mkdir -p .github/workflows
vim .github/workflows/gh-pages.yml
我们新建的gh-pages.yml内容:
name: GitHub Pages Site Build and Deploy workflow
on:
  # 触发流水线的事件,推送或者合并
  push:
    branches:
      - main

  pull_request:
    branches:
      - main
jobs:
  build-and-deploy:
    # 使用构建镜像
    runs-on: ubuntu-latest
    concurrency:
      group: ${{ github.workflow }}-${{ github.ref }}

    # clone代码,使用checkout这个action,不带@表示使用最新版本,官方建议带。
    steps:
      - name: Checkout
        uses: actions/checkout@v2
    # 构建代码,相当于使用别人做的mdbook docker
      - name: Build and Deploy
        uses: peaceiris/actions-mdbook@v1
        with:
          mdbook-version: 'latest'
    # 构建代码
      - run: mdbook build

    # 部署静态页面
      - name: Deploy
        uses: peaceiris/actions-gh-pages@v3
        if: ${{ github.ref == 'refs/heads/main' }}
        with:
          github_token: ${{ secrets.GITHUB_TOKEN }}
          publish_branch: gh-pages
          publish_dir: ./book
在提交代码之前需要:
1.创建ssh密钥对
密钥对生成在当前目录下,千万不要在工程目录下创建,否则不小心提交上去就悲剧了。
cd #切换到用户目录去创建
git config --global user.name yourname
git config --global user.email yourname@gmail.com

ssh-keygen -t rsa -b 4096 -C "$(git config user.email)" -f gh-pages -N ""
2.github上创建项目并配置
-
创建项目名称:your-github-name.github.io
-
仓库的Settings里的Deploy Keys项目添加key,
title为ACTIONS_DEPLOY_KEY,Key填入公钥文件gh-pages.pub的内容,勾选Allow write access;在Secrets下的Actions内添加Secrets,
Name为ACTIONS_DEPLOY_KEY,Secrets填入私钥文件gh-pages的内容。
3.推送本地项目
# 初始化当前mdbook工程,并将本地项目的远端设置为新建的git仓库地址
git init .
git add *
git commit -m "first commit"
git branch -M main
git remote add origin git@github.com:errorcode7/errorcode7.github.io.git
# push前,保证本地.ssh下的公钥已经添加到github账户Settings的SSH keys
git push -u origin main
4.检查部署页面
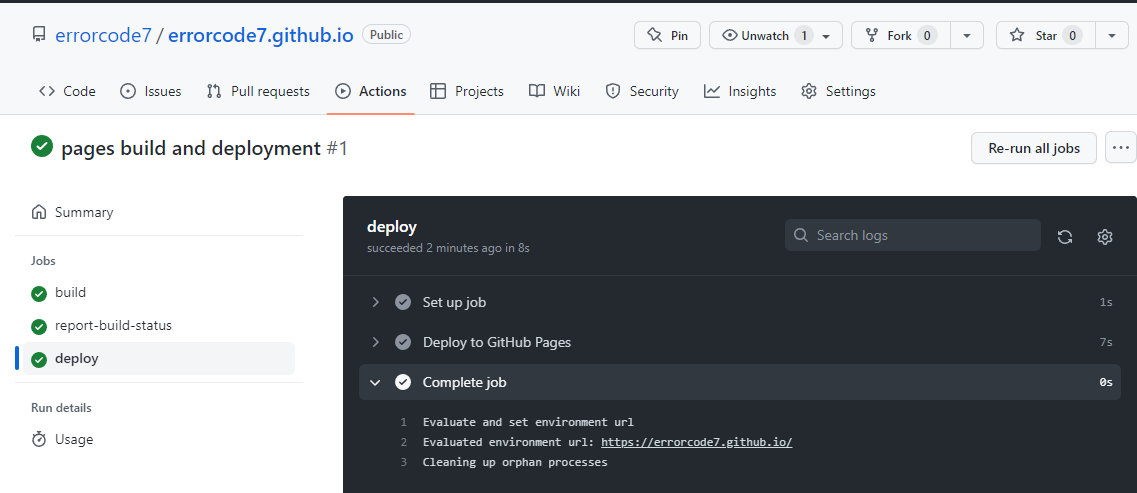
提交成功后点击仓库里的Actions,查看流水线构建情况。
提交代码后会触发构建流水线,生成的静态网页会被自动提交到gh-pages分支,触发静态网页部署的流水线,因此每次提交都有两个流水线,源码构建与page部署,其中pages build and deployment是部署到github.io的流水线。
注意:如果页面404,到项目的Settings->Pages下查看Pages站点的来源是那个分支,可以手动切换到gh-pages分支,会重新触发Action,要等部署完才生效。
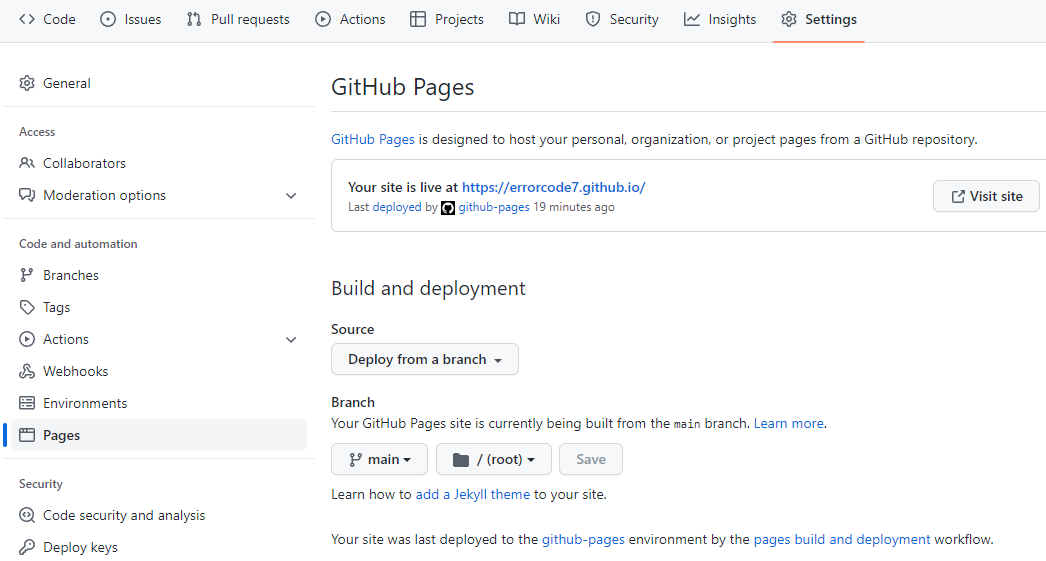
当前pages工程的仓库地址:https://github.com/errorcode7/errorcode7.github.io
参考:https://github.com/marketplace/actions/mdbook-action
3D渲染基本概念
- 顶点(vertex),描述物体在三维坐标中的向量,一个三角面有三个点,每个顶点有一组三维坐标项链[x,y,z],物体越复杂,构成的顶点则越多。物体除了顶点还有纹理坐标,法线,顶点色等数据组成,把这一组数据统称vertex buffer,存储数据的格式有很多种。
- index buffer,物体的表面需要上色,三个顶点是构成一个面的最小单元,记录一组顶点下标的数组,叫做index buffer。当我们绘制多边形的时候,传入的是顶点的索引,而非索引数组,可提高代码效率。比如我们绘制四边形的时候,需要传入两个三角形的顶点,当我们用索引记录的时候,只需要传入包含6个顶点的索引的index buffer即可。
- 纹理(Texture),自然界中重复出现的颜色叫做纹理,多种重复出现的纹理可以组合继续重复出现,构成更大的纹理,在二维平面中就是一张图片。顶点的纹理坐标记录着顶点在纹理二维平面中的坐标,3维空间中的顶点通过这个纹理坐标映射到在纹理数据中的坐标,使得每个单元都有对应的颜色。
- 光栅化(rasterization),三角形在屏幕坐标中是由N个正方形像素构成,用颜色填充三角形覆盖范围内的像素的过程叫做光栅化。这个固定的步骤是可以固定计算单元实现,叫做rasterizer。在填充之前,需要将3D空间中的三角形变换为屏幕中的2D三角形。最终的颜色是由材质,纹理,光源等经过就算得出,类似函数y=ax1+bx2+cx3一样多个参数输出,控制最终的输出。(光栅化这个翻译,就不能信达雅吗?)
- 着色器(shader),shade本意是阴影,shader最初是用计算光照和阴影的,上色的过程本质就是一个计算的过程,每一个计算的函数也叫做一个shader。因此shader并不只是上色,只要有变换的地方都需要计算,变换千差万别,计算函数也千差万别,因此这部分是可编程的,所谓的shader编程本质就是函数编程。处理顶点的叫vertex shader,处理像素的叫pixel shader,不同的shader出现在流水线(管线)的不同阶段。
- 管线(pipline),将原始数据,像工厂流水线一样,经过各种单元处理,最终生成可以显示输出的帧(framebuffer)对象。
- surface,这是egl的概念,像是一个可以修改的图层或画布,对内管理着它拥有的framebuffer,对外(窗口)表示自己有显示能力,不同操作系统的窗口管理器产生的窗口都可以和surface绑定,让它提供显示能力,不用关心它一个还是多个buffer实现,它可以在屏幕内,也可在以屏幕外。结合Wayland的描述,它可以和背景绑定,窗口绑定,光标绑定。OpenGL只负责将数据渲染成帧,并不负责输出到屏幕。输出屏幕的工作叫做送显示,属于窗口管理器的活儿。早年显卡没有3D渲染加速时候的主要工作就是送显,这个部件叫做
Display Controller,kms驱动就是为他服务。操作系统的核心就是管理硬件,抽象成资源,被软件复用,多个应用程序都要输出则需要对显卡复用,首先驱动层面就要支持,其次系统层面要统一管理。渲染产生的帧通过surface被窗口记录,窗口管理器将不同窗口进程的记录的帧通知合成器统一合成,合成器把背景,多个窗口,光标交给硬件合成为一帧,然后送显部件送给显示器显示。全屏游戏独占屏幕,应用显示的帧几乎就是最终送显的帧,手机app这类占用大部分屏幕且状态栏基本没有变化的场景,合成的成本很低。
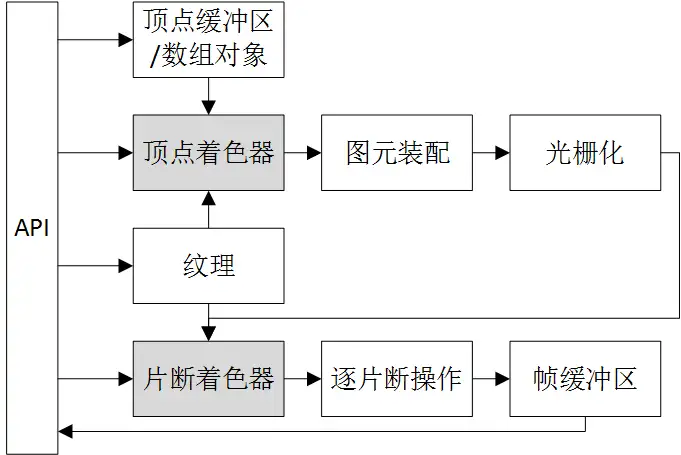
OpenGL ES3 管线流水线中,API箭头表示可以输入的部分。
vertex shader 实现代码
#version 300 es   // OpenGL ES版本信息
uniform mat4 u_mvpMatrix;  // 同一变量u_mvpMatrix,它存储组合的模型视图和投影矩阵。

// 描述顶点着色器的输入
in vec4 a_postion; // 输入顶点位置属性
in vec4 a_color; // 输入顶点颜色属性

out vec4 v_color; // 存储描述每个顶点颜色的顶点着色器输出

void main(){ // 主函数
	v_color = a_color; // 读入顶点属性输入a_color,并将其写入顶点输出颜色v_color
	gl_Position = u_mvpMatrix * a_postion // gl_Position是自动生成的,将变换后的顶点位置写入gl_Position输出
}
shader的本质就是y=ax1+bx2+cx3这样的矩阵计算,因此,输出入包含变和不变量两个部分,以u_mvpMatrix代表的是[a,b,c]这样的不变部分;a_postion,a_color这类顶点数据则代表做x1,x2这类变化的部分。
https://www.bilibili.com/video/BV1P44y1V7bu/ 《上帝视角看GPU(1):图形流水线基础》 https://vulkan-tutorial.com/Vertex_buffers/Vertex_input_description 《vulkan教程》 https://blog.csdn.net/xzben/article/details/124107260 《OpenGL 之Texture》 https://zhuanlan.zhihu.com/p/381327745 《【Learn OpenGL笔记】纹理(Texture)》 https://zhuanlan.zhihu.com/p/144332091 《计算机图形学七:纹理映射(Texture Mapping)及Mipmap技术》 https://www.intel.com/content/dam/develop/external/us/en/documents/the-architecture-of-intel-processor-graphics-gen11-r1new.pdf 《Intel核显Display Controller》
x11
x11是C/S模型,每个主机可以启动多个xserver作为服务器,每个服务器开启一个端口,供客户端连接,每个服务器可以有多个screen(显示器),因此服务地址的格式为DISPLAY=host:port.screen_number,由于默认端口为6000起步,真实tcp/ip端口为6000+port。
每个screen可以上可以创建多个窗口。
xlib
xlib是协议的c语言接口。
GraphicsContext
绘图操作需要控制数据,通过数据结构保存这些复杂参数,传递给Server。
xcb
X协议的C语言绑定,相比xlib,占用空间小,延迟低,多线程,可扩展等特性。
https://www.x.org/wiki/guide/xlib-and-xcb/ https://www.x.org/releases/current/doc/libxcb/tutorial/index.html
arm ABI
调用约定
ARM64 ABI(应用程序二进制接口)中规定了在函数调用过程中,哪些寄存器的值需要由调用方(caller)负责保存,哪些由被调用方(callee)负责保存。
ARM64 中的寄存器分类
AAPCS64 ABI
| 寄存器 | 类型 | 别名 | 说明 |
|---|---|---|---|
| x0 – x7 | caller-saved | 参数 / 返回值 | 用于传递前8个参数;x0/x1 也用于返回值 |
| x8 | caller-saved | 间接结果 | 用于某些系统调用或大返回值 |
| x9 – x15 | caller-saved | 临时寄存器 | callee 可自由使用 |
| x16 – x17 | caller-saved | IP0/IP1 | 用于跳转、链接器内部使用 |
| x18 | 特殊 | 平台寄存器 | 通常保留给平台(如 TLS) |
| x19 – x29 | callee-saved | 通用寄存器 | callee 若使用,必须保存并恢复 |
| x30 | callee-saved(部分) | lr(链接寄存器) | 存放返回地址,通常需保存 |
// caller 函数
long caller(long a, long b) {
    long temp = a + b;          // 假设 temp 存在 x0
    long result = callee(a);    // 调用 callee
    return temp + result;       // ← 这里仍要用 temp(原 x0 的值)
}
// callee 函数
long callee(long x) {
    return x * 2;               // 编译器可能用 x0 存放 x 和返回值
}
编译器生成的汇编(简化):
caller:
    add x0, x0, x1        // temp = a + b → 存在 x0
    stp x0, x1, [sp, #-16]!   // ← 保存 x0(temp)!因为 callee 会覆盖它
    bl callee             // 调用 callee(callee 会用 x0 存参数和返回值)
    ldp x2, x1, [sp], #16     // 恢复 temp 到 x2
    add x0, x2, x0        // return temp + result
    ret

callee:
    lsl x0, x0, #1        // x0 = x * 2
    ret                   // 直接返回,不恢复 x0(因为它是 caller-saved)
设计目的
x0-x7作为参数寄存器,要一层一层的传递给callee,如果在caller做了修改,直接作为参数就传递进callee去了,他们经常需要被传递和修改,就像一个context或者全局变量一样,穿梭在各种函数之间,尤其是x0,x1这种既作为参数又作为返回值的寄存器,使用后不管是常态。
如果某些值需要保留生命周期,留在当前的caller里继续使用,向局部变量那样,则压栈,或者分配到x19–x28(callee-saved),arm不是像x86那样一开始就开辟栈来保存局部变量。压栈和放到寄存器肯定是优先使用寄存器,当寄存器不够用的时候,才考虑压栈。
caller其实不知道哪些当前使用过的寄存器后续会不会被使用,决定要不要压栈是编译器的事,压栈属于编译器分析代码后的决定。比如一个变量放在x2里被操作,编译器编译过程中把他压栈,后续再使用变量的时候,编译器可能把它恢复到x3里倍操作。
ARM KVM上下文切换机制分析
概述
本文档深入分析ARM架构中KVM(Kernel-based Virtual Machine)的上下文切换机制,重点解析__kvm_vcpu_run_vhe函数的工作原理和上下文切换的具体实现。本文需要有一定的知识,如中断、系统调用、x86虚拟化、arm异常级别,虚拟地址翻译等。
关键概念
- VHE (Virtualization Host Extension):ARMv8.1引入的虚拟化扩展,允许hypervisor在EL2运行
- Non-VHE:传统虚拟化模式,hypervisor在EL1,依赖EL2进行虚拟化操作
- 上下文切换:在host、guest和hypervisor之间切换执行状态的过程
- 阶段2转换:guest虚拟地址到物理地址的地址转换
寄存器分类
在了解上下文切换之前,我们必须先了解寄存器的分类。
| 类别 | 核心作用 | 典型场景 | 是否需上下文切换时保存? |
|---|---|---|---|
| 执行上下文寄存器 | 运行程序的“工作台” | 函数调用、变量存储 | ✅ 必须(Host/Guest 切换) |
| 系统控制寄存器 | 配置 CPU“工作模式” | 开启MMU、设置页表、虚拟化陷阱 | ✅ Guest 独有,Host/Guest 切换时保存 |
| 异常状态寄存器 | 记录“出事时的情况” | 缺页处理、未定义指令捕获 | ❌ 异常处理完即用完,不长期保存 |
执行上下文寄存器(Execution Context Registers)
作用:直接参与程序的指令执行与数据运算,是“代码运行时的现场”。
| 子类 | 寄存器示例 | 说明 |
|---|---|---|
| 通用寄存器 | x0–x30 | 存放操作数、地址、函数参数/返回值 |
| 程序计数器 | PC(隐式) | 指向下一条要执行的指令 |
| 栈指针 | SP_EL0/1/2 | 指向当前栈顶,用于函数调用/局部变量 |
| 链接寄存器 | x30 / LR_ELx | 保存函数返回地址 |
- 被编译器和 ABI 直接使用。
- 用户态和内核态都大量使用。
- 上下文切换(如进程调度、VM-Exit)时必须完整保存/恢复。
统控制寄存器(System Control Registers)
作用:配置 CPU 的行为模式,决定“如何执行”而非“执行什么”。它的核心特点是控制。
| 功能域 | 寄存器示例 | 控制内容 |
|---|---|---|
| 内存管理 | SCTLR_EL1, TTBR0_EL1, TCR_EL1 | MMU 开关、页表基址、地址空间布局 |
| 虚拟化 | HCR_EL2, VTTBR_EL2 | 是否启用 Stage-2 转换、哪些操作 trap 到 EL2 |
| 中断/异常 | DAIF(PSTATE)、ICC_SRE_EL1 | 屏蔽 IRQ/FIQ/SError、中断路由 |
| 安全扩展 | SCR_EL3 | EL2 是否可用、Secure/Non-secure 切换 |
| 性能/调试 | PMCR_EL0, OSLAR_EL1 | 性能计数器使能、调试锁 |
- 通常只在特权级(EL1/EL2/EL3)可写,一般由操作系统和内核模块负责修改。
- 修改后影响后续所有指令的执行环境。
- 很多寄存器的某一位是“控制位”,另一些位是“状态位”。
异常与状态保存寄存器(Exception & State-Saving Registers)
作用:在异常发生时自动保存关键状态,用于后续恢复或诊断。它们不用于主动控制 CPU,而是被动反映异常瞬间的状态,影响操作系统的执行逻辑。
| 寄存器 | 作用 |
|---|---|
ELR_ELx | 保存异常发生时的 PC(返回地址) |
SPSR_ELx | 保存异常发生时的 PSTATE(含 DAIF、EL、NZCV 等) |
ESR_ELx | 记录异常原因(如缺页类型、未定义指令) |
FAR_ELx | 记录引发异常的虚拟地址 |
- 由硬件在异常入口自动填充。
- 主要供异常处理程序(如内核)读取,用于决定如何响应。
- 通常不可由软件直接用于控制 CPU 行为(只读或写无效)。
虚拟化常见寄存器
虚拟化控制寄存器
| 寄存器名 | 全称 | 功能说明 | 关键作用 |
|---|---|---|---|
| HCR_EL2 | Hypervisor Configuration Register | 控制虚拟化行为的各个方面 | 通过位设置决定哪些操作(如内存访问、指令执行)会陷阱(trap)到 EL2 |
| VTTBR_EL2 | Virtualization Translation Table Base Register | 指向 OS 的二级页表 | 包含 VMID(虚拟机标识符)和 Stage-2 页表的物理基地址 |
| VTCR_EL2 | Virtualization Translation Control Register | 控制二级地址转换(Stage-2 translation)参数 | 定义 IPA(Intermediate Physical Address)空间大小、页表粒度(如4KB/16KB/64KB)等 |
| TTBR0/1_EL2 | Translation Table Base Register | 指向 OS 的一级页表 | 供mmu实现虚拟地址到物理地址/中间地址的转换 |
状态与异常处理寄存器
| 寄存器名 | 全称 | 功能说明 | 关键作用 |
|---|---|---|---|
| ESR_EL2 | Exception Syndrome Register | 记录异常的详细信息 | 提供异常类型、指令信息等,用于 EL2 异常处理和调试 |
| FAR_EL2 | Fault Address Register | 记录引发数据/指令访问错误的虚拟地址 | 用于页错误(Page Fault)诊断,指出出错的虚拟地址 |
| HPFAR_EL2 | Hypervisor IPA Fault Address Register | 记录 Guest 物理地址(IPA)错误 | 在 Stage-2 地址转换失败时,提供出错的 IPA 高位(配合 FAR_EL2 使用) |
总体架构
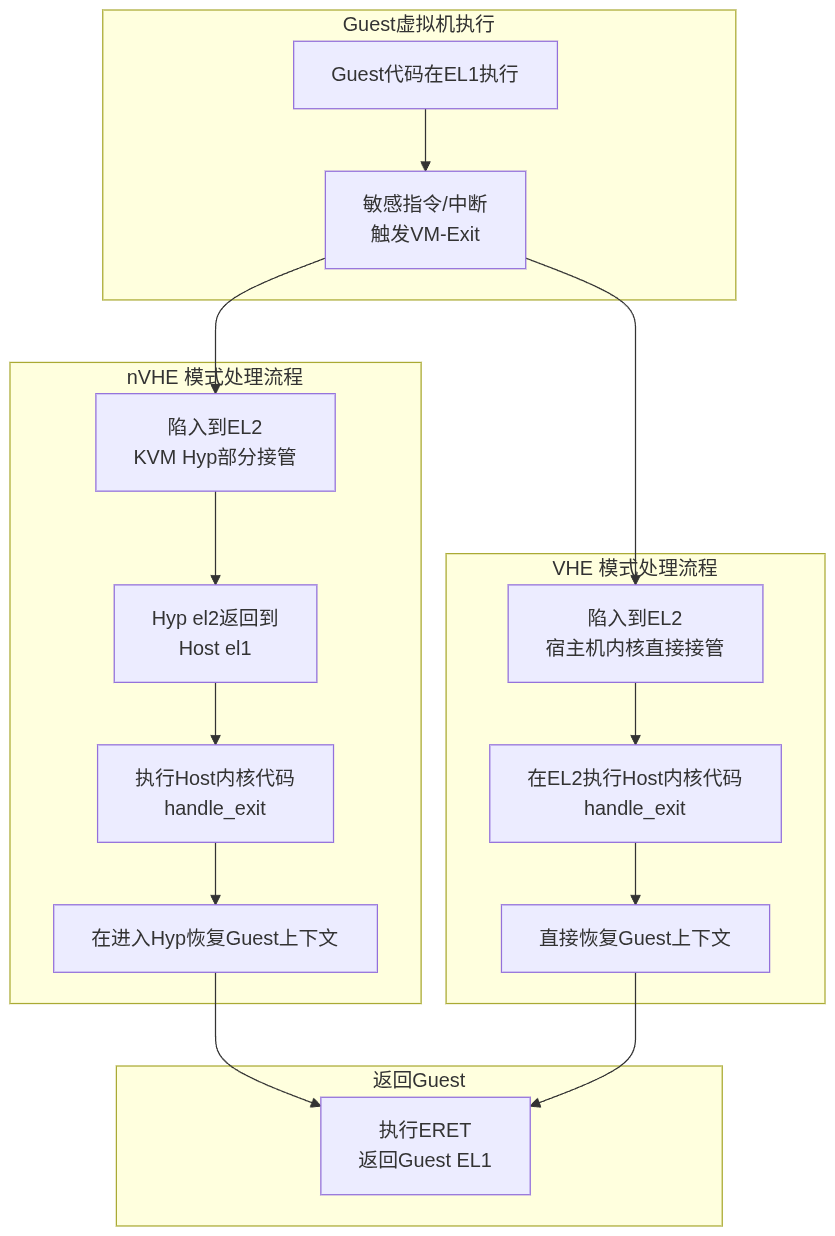
先来一张总体流程图,大概描述整个kvm用户空间和内核空间是如何协同工作的。

-
用户空间代码调用ioctl系统调用,触发内核kvm模块实现的函数调用,在内核的hypervisor发生上下文切换,也就是将host运行的指令保存,载入guest的指令(上下文)到CPU,在
__guest_enter调用eret,进入guest的EL1级别继续执行PC寄存器的指令。(host el0 -> host el2 -> guest el1 ) -
当CPU执行到敏感指令的时候,触发异常,退出guest状态,陷入到L2级别hypervisor的中断向量,中断向量很快就跳转到
__guest_exit,__guest_exitret后,CPU回到hypervisor上下文,经过fixup_guest_exit简单的处理,如果成功,则仅需切回guest。如果失败,则需要继续回到host,在host内handle_exit处理捕获到的异常,当处理成功,则继续在切换到guest处理,当处理失败,则错误返回给用户空间处理,用户空间处理完成后继续调用ioctl进入内核,发生上下文切换,执行guest代码。
Q:什么是用户空间代码?作用是什么?
A:qemu这类用户态程序。
-
管理VM和VCPU的生命周期。
-
设备模拟和环境准备,如磁盘,内核文件,固件等;在内核无法处理异常,放到用户空间处理,比如IO,关机,信号、中断注入等。
-
分配虚拟机内存。
Q:什么是上下文切换?如何切换?
A:上下文就是CPU寄存器状态。在x86环境中,有一个数据结构叫做VMCS,两个对象记录host和guest的上下文;在arm环境中,记录上下文用kvm_cpu_context,一个是kvm对象引用的kvm_cpu_context记录guest的上下文,通过perCPU上定义的kvm_cpu_context记录host的上下文。第一次运行的时候,要先准备好guest的上下文。整个原理是我们的核心分析过程,后面将详细描述。
Q:什么是guest和host?
A:host是宿主机执行指令的状态,guest是虚拟机执行指令的状态。当从host切换到guest执行代码的时候,需要在host执行切换相关的代码,设置CPU工作模式,CPU进入guest的工作状态,保存host的寄存器到内存,载入guest的寄存器值到CPU,然后特定的指令来模拟恢复到之前执行状态。guest状态切换到host,反之亦然。
在x86中,host就是vmx root mode,不过没必要去记root和none-root,只需要记住host状态和guest状态。
Q:什么是敏感指令?
A:敏感指令就是CPU虚拟化里定义的,需要特殊关注处理的指令。arm则的所有敏感指令都是特权指令,因此只有el1的状态的guest才能陷入el2。x86的敏感指令既有特权指令也有非特权指令,不必刻意去区分是否拥有特权,只需要知道他们特殊罢了。
CPU有各种工作模式,当你不开启虚拟化,那么就不会关注敏感指令,当开启虚拟,并通过设置特定寄存器告诉CPU要关注某些敏感指令,一旦CPU处于guest状态,流水线上发现了敏感指令,则触发中断,在中断里模拟指令的实现。
你可以想象一下马里奥踩到特殊地砖,进入到地下执行任务,执行完了后再次回到地上的流程,去地下就是回到host,模拟执行特殊指令。进入到host状态,这个过程叫做VM-exit,进入到guest状态的过程叫做VM-entry。
Q:CPU如何知道当前运行的是guest,需要去拦截敏感指令?
A:CPU寄存器分为控制CPU工作模式的控制寄存器,状态寄存器,执行上下文寄存器这几类。在CPU切换到guest代码之前,host代码会去操作控制寄存器,让CPU以另外一种工作模式运行,敏感指令就被监控,一旦触发就陷入异常,回到host模拟。
关键函数
关键流程
ioctl(vcpu_fd, KVM_RUN, NULL);//qemu
  ↓
kvm_vcpu_ioctl()
    kvm_arch_vcpu_ioctl_run()
        kvm_arm_vcpu_enter_exit()
            kvm_call_hyp_ret(__kvm_vcpu_run, vcpu)
            ├─ VHE模式: __kvm_vcpu_run_vhe()
            └─ 非VHE模式: __kvm_vcpu_run()
                __guest_enter() (汇编实现)
                   eret (异常返回指令)
1. 用户空间代码
来源:Linux虚拟化KVM-Qemu分析(四)之CPU虚拟化(2),这份代码模拟qemu的基本工作原理:
- 打开kvm对象,根据kvm对象创建vm对象,根据vm对象创建VCPU。
- 分配用户空间地址,将可执行二进制映射到分配的内存。
- KVM_SET_USER_MEMORY_REGION系统调用,将分配的用户空间地址作为虚拟机的物理内存地址。
- 使用kvm实现的mmap函数,将VCPU内记录运行状态的内存共享到用户空间,方便读取从内核返回到用户空间的原因。
- 设置CPU最初始化的寻址方式,从物理内存的指定位置读取内存。(这是x86的设置方式)。
- 使用KVM_RUN启动VCPU,当系统调用返回的时候读取内核返回的原因,然后在用户空间处理,处理后继续运行VCPU。
#define KVM_DEV "/dev/kvm"
#define TINY_KERNEL_FILE "./tiny_kernel.bin"
#define PAGE_SIZE 0x1000
int main(void)
{
int kvm_fd;
int vm_fd;
int vcpu_fd;
int tiny_kernel_fd;
int ret;
int mmap_size;
struct kvm_sregs sregs;
struct kvm_regs regs;
struct kvm_userspace_memory_region mem;
struct kvm_run *kvm_run;
void *userspace_addr;
/*打开kvm设备,返回代表kvm的套接字*/
kvm_fd = open(KVM_DEV, O_RDWR);
assert(kvm_fd > 0);
/*创建VM对象 */
vm_fd = ioctl(kvm_fd, KVM_CREATE_VM, 0);
assert(vm_fd >= 0);
/*根据vm对象创建vcpu对象*/
vcpu_fd = ioctl(vm_fd, KVM_CREATE_VCPU, 0);//kvm_vm_ioctl_create_vcpu在内核创建vcpu对象
assert(vcpu_fd >= 0);
/* map 4K into memory */
userspace_addr = mmap(NULL, PAGE_SIZE, PROT_READ | PROT_WRITE, MAP_SHARED | MAP_ANONYMOUS, -1, 0);
assert(userspace_addr > 0);
/* 打开虚拟机将运行的二进制 */
tiny_kernel_fd = open(TINY_KERNEL_FILE, O_RDONLY);
assert(tiny_kernel_fd > 0);
/* 文件映射到内存 */
ret = read(tiny_kernel_fd, userspace_addr, PAGE_SIZE);
assert(ret >= 0);
/*将二进制映射到内存*/
/*将当前进程分配的虚拟内存,作为虚拟机的物理内存*/
mem.slot = 0;
mem.flags = 0;
mem.guest_phys_addr = 0;
mem.memory_size = PAGE_SIZE;
mem.userspace_addr = (unsigned long)userspace_addr;
/*KVM_SET_USER_MEMORY_REGION将虚拟内存作为vm对象的内存,此时VCPU读取物理内存*/
ret = ioctl(vm_fd, KVM_SET_USER_MEMORY_REGION, &mem);
assert(ret >= 0);
/* KVM_GET_VCPU_MMAP_SIZE获取kvm_run地址,这个结构体用于存储运行kvm运行状态,
用户空间代码通过这个结构体获取kvm的运行状态
*/
mmap_size = ioctl(kvm_fd, KVM_GET_VCPU_MMAP_SIZE, NULL);
assert(mmap_size >= 0);
//这里很有意思,将vcpu的内存映射到用户空间。
kvm_run = (struct kvm_run *)mmap(NULL, mmap_size, PROT_READ | PROT_WRITE, MAP_SHARED, vcpu_fd, 0);
assert(kvm_run >= 0);
/*sregs包含了x86架构的系统寄存器和段寄存器状态,这些寄存器控制着CPU的核心操作模式
tiny_kernel.bin预期被加载到物理地址0,并且从16位实模式开始执行。
*/
ret = ioctl(vcpu_fd, KVM_GET_SREGS, &sregs);
assert(ret >= 0);
sregs.cs.base = 0;
sregs.cs.selector = 0;
ret = ioctl(vcpu_fd, KVM_SET_SREGS, &sregs);
memset(®s, 0, sizeof(struct kvm_regs));
regs.rip = 0;
ret = ioctl(vcpu_fd, KVM_SET_REGS, ®s);
assert(ret >= 0);
/* 指定一个cpu运行,一个CPU对应一个kvm_run结构体 */
while (1) {
ret = ioctl(vcpu_fd, KVM_RUN, NULL);ioctl(vcpu_fd, KVM_RUN, NULL);
assert(ret >= 0);
switch(kvm_run->exit_reason) {
case KVM_EXIT_HLT:
printf("----KVM EXIT HLT----\n");
close(kvm_fd);
close(tiny_kernel_fd);
return 0;
case KVM_EXIT_IO:
putchar(*(((char *)kvm_run) + kvm_run->io.data_offset));
break;
default:
printf("Unknow exit reason: %d\n", kvm_run->exit_reason);
break;
}
}
return 0;
}
2. kvm驱动实现
KVM_RUN系统调用入口
ioctl(vcpu_fd, KVM_RUN, NULL)实际调用的对应在内核中的处理逻辑如下:
static long kvm_vcpu_ioctl(struct file *filp,
			   unsigned int ioctl, unsigned long arg)
{
	struct kvm_vcpu *vcpu = filp->private_data;//从套接字对应的filp对象中获取vcpu对象。
    ....
	switch (ioctl) {
	case KVM_RUN: {
        ....
		r = kvm_arch_vcpu_ioctl_run(vcpu);//关键入口,返回整数r,错误原因
		....
		break;
	}
...
}
在host处理异常,在kvm_arch_vcpu_ioctl_run内,都还属于host kernel的范围,kvm_arm_vcpu_enter_exit这是在准备进入到hypervisor。handle_exit处理异常,处理成功则继续循环,处理失败则返回,最终回到用户空间。
int kvm_arch_vcpu_ioctl_run(struct kvm_vcpu *vcpu)
{
	struct kvm_run *run = vcpu->run;
	int ret;

	if (run->exit_reason == KVM_EXIT_MMIO) {
		ret = kvm_handle_mmio_return(vcpu);
		if (ret)
			return ret;
	}

	vcpu_load(vcpu);

	if (run->immediate_exit) {
		ret = -EINTR;
		goto out;
	}

	kvm_sigset_activate(vcpu);

	ret = 1;
	run->exit_reason = KVM_EXIT_UNKNOWN;
	run->flags = 0;
	while (ret > 0) {
        ...
		ret = kvm_arm_vcpu_enter_exit(vcpu);
        ...
		ret = handle_exit(vcpu, ret);
	}
    ...
	return ret;
}

static int noinstr kvm_arm_vcpu_enter_exit(struct kvm_vcpu *vcpu)
{
	int ret;

	guest_state_enter_irqoff();
	ret = kvm_call_hyp_ret(__kvm_vcpu_run, vcpu);//封装
	guest_state_exit_irqoff();

	return ret;
}
VHE模式
nVHE
kvm_call_hyp_ret算是host和hypervisor的分界线,这里根据 has_vhe()判断是否启用了VHE,决定使用哪种调用。
- 在非VHE模式模式中,kvm_call_hyp_ret() 宏走kvm_call_hyp_nvhe路径,调用arm_smccc_1_1_hvc,会触发一个 HVC 指令,把当前正在运行在内核中EL1状态的 CPU陷入 EL2,才能执行host和guest的上下文切换,进入到guest的。也就是说,在内核中的kvm模块需要再次陷入到更高的异常级别才能操作硬件资源。
- VHE模式中,Linux 内核本身就在 EL2 运行,所以直接调用 f() 同样是在 EL2 中,不用陷入到EL2。
#ifndef __KVM_NVHE_HYPERVISOR__
#define kvm_call_hyp_nvhe(f, ...)						\
	({								\
		struct arm_smccc_res res;				\
									\
		arm_smccc_1_1_hvc(KVM_HOST_SMCCC_FUNC(f),		\
				  ##__VA_ARGS__, &res);			\
		WARN_ON(res.a0 != SMCCC_RET_SUCCESS);			\
									\
		res.a1;							\
	})

/*
 * The isb() below is there to guarantee the same behaviour on VHE as on !VHE,
 * where the eret to EL1 acts as a context synchronization event.
 */
#define kvm_call_hyp(f, ...)						\
	do {								\
		if (has_vhe()) {					\
			f(__VA_ARGS__);					\
			isb();						\
		} else {						\
			kvm_call_hyp_nvhe(f, ##__VA_ARGS__);		\
		}							\
	} while(0)

#define kvm_call_hyp_ret(f, ...)					\
	({								\
		typeof(f(__VA_ARGS__)) ret;				\
									\
		if (has_vhe()) {					\
			ret = f(__VA_ARGS__);				\
		} else {						\
			ret = kvm_call_hyp_nvhe(f, ##__VA_ARGS__);	\
		}							\
									\
		ret;							\
	})
#else /* __KVM_NVHE_HYPERVISOR__ */
#define kvm_call_hyp(f, ...) f(__VA_ARGS__)
#define kvm_call_hyp_ret(f, ...) f(__VA_ARGS__)
#define kvm_call_hyp_nvhe(f, ...) f(__VA_ARGS__)
从这里可以看出nVHE模式, kvm_call_hyp_ret是el1到el2的标志。将hyp和host做了区分。
kvm_arch_vcpu_ioctl_run()
{
    while (ret > 0) {
        ...
    	ret = kvm_arm_vcpu_enter_exit(vcpu);//这里进入,内部就是kvm_call_hyp_ret提权操作
        ...
    	ret = handle_exit(vcpu, ret);//host处理,处理不了就再返回
    }
}
在之前的arm规范中,严格区分了内核代码运行在EL1和hypervisor运行在EL2,也就是nVHE模式的kvm实现。
进入guest:
- 当用户启动虚拟机的时候,要先系统调用进入内核(Host EL1),内核再通过HVC 指令进入EL2级别的执行hypervisor代码,hypervisor进入到guest代码运行。
退出guest:
- 同样,guest代码运行的时候访问io资源,guest处于el1的状态,执行的敏感指令被拦截,陷入到EL2级里的hypervisor执行,在EL2内的hypervisor只能处理简单的异常,大部分异常需要继续返回。再从EL2返回到EL1的内核态的kvm模块处理,在EL1内核态再返回给用户。
- 用户态处理完后还要通过系统调用,如一开始运行那样进入guest执行。
VHE
为了减少这么多步骤的异常级切换,直接让hypervisor和内核工作在一个异常级别即可。ARMv8.1 通过以下机制,使得内核运行在 EL2 : HCR_EL2.E2H = 1(Enable EL2 Host), 当此位为 1 时,EL2 的行为被“重塑”:
-
访问 TTBR0_EL1 实际操作的是 TTBR0_EL2,也就是说,之前的内核代码不用修改访问寄存器的指令,就可以访问TTBR0_EL2(页表寄存器)。
-
SPSR_EL1、ELR_EL1 等寄存器在 EL2 中可用
-
系统调用(SVC)可以从 EL0 直接陷入 EL2(而非 EL1)
效果:相当于取消host EL1,直接让内核工作在EL2。
HCR_EL2.TGE = 1(Trap General Exceptions)
- 配合 E2H,使 EL0 的异常(如 SVC、IRQ)直接路由到 EL2。
Stage-1 页表支持
-
即使在 EL2,也可以使用自己的 Stage-1 页表(通过 TTBR0_EL2 / TTBR1_EL2),实现虚拟地址空间。
-
但 Linux 内核严重依赖虚拟内存(
vmalloc,slab, 用户态映射等)。
| 机制 | 解决的问题 | 实现效果 |
|---|---|---|
E2H=1 | EL2 无法使用 EL1 寄存器 | 寄存器别名映射,Linux 代码无需修改 |
TGE=1 | EL0 异常无法路由到 EL2 | 异常直接陷入 EL2,Host 能处理 syscall/IRQ |
| Stage-1 in EL2 | EL2 无虚拟内存支持 | 完整虚拟地址空间,支持现代 OS 内存管理 |
最终,本质上kvm和内核都工作在EL2,host上只有EL0和EL2,根x86差不多。
ARM KVM上下文切换实现
__kvm_vcpu_run_vhe函数
在寄存器分类中,我们知道分为执行上下文,系统控制,异常状态这几类,所以进入上下文切换之前,需要:
- 保存一些host的CPU运行状态
- 设置CPU进入虚拟化执行的工作模式
- 恢复恢复guest的CPU运行状态,有了运行状态,guest在el1的系统就有了运行逻辑的参考依据,一旦切换执行上下文成功,比如栈寄存器和PC寄存器就位,马上就可以开始有条不紊的工作。
arm PC寄存器不能直接填入将指令的地址,需要将地址放入ELR_ELx,当执行 eret 的时候,ELR_ELx的值被自动弹入到PC,SPSR_ELx弹入到PSTATE,切换到 SPSR_ELx 指定的异常级别开始取指运行。也就是进入到guest的el1的内核态开始执行。
/* Switch to the guest for VHE systems running in EL2 */
static int __kvm_vcpu_run_vhe(struct kvm_vcpu *vcpu)
{
	struct kvm_cpu_context *host_ctxt;
	struct kvm_cpu_context *guest_ctxt;
	u64 exit_code;

	host_ctxt = host_data_ptr(host_ctxt);
	guest_ctxt = &vcpu->arch.ctxt;

	fpsimd_lazy_switch_to_guest(vcpu);

	sysreg_save_host_state_vhe(host_ctxt);

	/*
	 * Note that ARM erratum 1165522 requires us to configure both stage 1
	 * and stage 2 translation for the guest context before we clear
	 * HCR_EL2.TGE. The stage 1 and stage 2 guest context has already been
	 * loaded on the CPU in kvm_vcpu_load_vhe().
	 */
	__activate_traps(vcpu);//设置捕获敏感指令,x86是通过vmcs里的字段控制,由特定指令载入寄存器。

	__kvm_adjust_pc(vcpu);
	//Guest 关键寄存器(如 ELR_EL2)设置放在 C 层,__guest_enter汇编只负责上下文切换。
	sysreg_restore_guest_state_vhe(guest_ctxt);//设置guest的PC寄存器值elr寄存器,方便eret

	do {
		/* Jump in the fire! */
		exit_code = __guest_enter(vcpu);//这里bl__guest_enter,lr寄存器记录返回地址。最终__guest_exit执行ret,返回exit_code

		/* And we're baaack! */
	} while (fixup_guest_exit(vcpu, &exit_code));//如果可以在el2快速处理就直接处理,不能则回到用户空间。

	sysreg_save_guest_state_vhe(guest_ctxt);

	__deactivate_traps(vcpu);

	sysreg_restore_host_state_vhe(host_ctxt);

	/*
	 * Ensure that all system register writes above have taken effect
	 * before returning to the host. In VHE mode, CPTR traps for
	 * FPSIMD/SVE/SME also apply to EL2, so FPSIMD/SVE/SME state must be
	 * manipulated after the ISB.
	 */
	isb();
	...
	return exit_code;
}
NOKPROBE_SYMBOL(__kvm_vcpu_run_vhe);

//sysreg-sr.c
void sysreg_restore_guest_state_vhe(struct kvm_cpu_context *ctxt) {
    __sysreg_restore_common_state(ctxt);
    __sysreg_restore_el2_return_state(ctxt);
}
//sysreg-sr.h:
static inline void __sysreg_restore_el2_return_state(struct kvm_cpu_context *ctxt) {
    // ...
    write_sysreg_el2(ctxt->regs.pc, SYS_ELR);//将PC值写入elr寄存器,方便eret
    write_sysreg_el2(pstate, SYS_SPSR);
}
__guest_enter汇编入口
__guest_enter的实现:
-
保存hyp上下文到kvm_hyp_ctxt,包括处于el2运行级别的通用寄存器和el0级的host用户栈sp_el0。
-
恢复guest上下文,处于el1运行级别的通用寄存器和el0级的guest用户栈sp_el0。
-
eret跳转到guest的PC寄存器,开始执行。
// Restore guest regs x0-x17,
// Restore guest regs x18-x29和lr
恢复上下文这里,为啥分成两段写,我觉得有点奇怪。
guest代码执行到敏感指令,触发异常,从guest的el1陷入到host的el2,进入el2_sync向量,这是一段垫片代码,最终执行到__guest_exit,将perCPU变量上保存的vcpu地址作为参数。
虽然guest陷入到el2,也是中断向量处理,但是hypervisor的中断向量不像内核的系统调用和中断那样先将用户态的上下文压栈保存到内核,返回用户态的时候恢复。不管是guest el1还是el0陷入el2,el2也只是使用sp_el2,sp_el1还静静的在哪,当返回到guest用户空间的时候,sp_el0会被覆盖。因此在切换回guest的时候,只需要恢复sp_el0,guest el1和el0的栈寄存器都和切换之前一样。
// arch/arm64/kvm/hyp/hyp-entry.S

el2_sync:
	/* Check for illegal exception return */
	mrs	x0, spsr_el2//读取到x0,spsr_el2记录了异常发生前的 PSTATE(如异常级、条件码、中断屏蔽等)
	tbnz	x0, #20, 1f //如果 SPSR_EL2 的 SS 位为 1,说明这是一个非法的 ERET 异常,就跳转到标签 1 处进行特殊处理。

	save_caller_saved_regs_vect //保存所有调用者保存的寄存器到堆栈上
	stp     x29, x30, [sp, #-16]! //将帧指针 x29 和链接寄存器 x30 压栈。这是在为调用 C 函数准备标准的堆栈帧。
	bl	kvm_unexpected_el2_exception //进入异常处理
	ldp     x29, x30, [sp], #16
	restore_caller_saved_regs_vect

	eret

1:
	/* Let's attempt a recovery from the illegal exception return */
	get_vcpu_ptr	x1, x0 //获取percpu上保存的vcpu传入给__guest_exit
	mov	x0, #ARM_EXCEPTION_IL
	b	__guest_exit

el1_sync:  // 同步异常(如 Data Abort)
    ...
	b.ne	el1_trap
el1_trap:
	get_vcpu_ptr	x1, x0
	mov	x0, #ARM_EXCEPTION_TRAP
	b	__guest_exit

//u64 __guest_enter(struct kvm_vcpu *vcpu);
SYM_FUNC_START(__guest_enter)
	// x0: vcpu,又是返回值
	// x1-x17: clobbered by macros
	// x29: guest context
    // x2 辅助计算。
	adr_this_cpu x1, kvm_hyp_ctxt, x2 //从cpu上获取 kvm_cpu_context对象的地址

	// Store the hyp regs
	save_callee_saved_regs x1//将当前调用者(已经进入到el2了,当前调用这个函数的就是hyp)x18-x30的寄存器保存到上下文。

	// Save hyp's sp_el0
	save_sp_el0	x1, x2 //将用户空间栈sp_el0保存到kvm_hyp_ctxt上下文。在进入__guest_enter前,都是执行Hypervisor的C代码,先系统调用,。
    //将hyp的上下文记录完。

	// Now the hyp state is stored if we have a pending RAS SError it must
	// affect the host or hyp. If any asynchronous exception is pending we
	// defer the guest entry. The DSB isn't necessary before v8.2 as any
	// SError would be fatal.
alternative_if ARM64_HAS_RAS_EXTN
	dsb	nshst
	isb
alternative_else_nop_endif
	mrs	x1, isr_el1
	cbz	x1,  1f
	mov	x0, #ARM_EXCEPTION_IRQ
	ret
1:
	set_loaded_vcpu x0, x1, x2

	add	x29, x0, #VCPU_CONTEXT,取x0的偏移赋值给x29,x29=vcpu->kvm_cpu_context

	// mte_switch_to_guest(g_ctxt, h_ctxt, tmp1)
	mte_switch_to_guest x29, x1, x2

	// Macro ptrauth_switch_to_guest format:
	// 	ptrauth_switch_to_guest(guest cxt, tmp1, tmp2, tmp3)
	// The below macro to restore guest keys is not implemented in C code
	// as it may cause Pointer Authentication key signing mismatch errors
	// when this feature is enabled for kernel code.
	ptrauth_switch_to_guest x29, x0, x1, x2

	// Restore the guest's sp_el0
	restore_sp_el0 x29, x0//将vcpu的sp_el0恢复到sp_el0,用户栈

	// Restore guest regs x0-x17,从x29的偏移取一对数据。
	ldp	x0, x1,   [x29, #CPU_XREG_OFFSET(0)]
	ldp	x2, x3,   [x29, #CPU_XREG_OFFSET(2)]
	ldp	x4, x5,   [x29, #CPU_XREG_OFFSET(4)]
	ldp	x6, x7,   [x29, #CPU_XREG_OFFSET(6)]
	ldp	x8, x9,   [x29, #CPU_XREG_OFFSET(8)]
	ldp	x10, x11, [x29, #CPU_XREG_OFFSET(10)]
	ldp	x12, x13, [x29, #CPU_XREG_OFFSET(12)]
	ldp	x14, x15, [x29, #CPU_XREG_OFFSET(14)]
	ldp	x16, x17, [x29, #CPU_XREG_OFFSET(16)]

	// Restore guest regs x18-x29和lr
	restore_callee_saved_regs x29 //从vcpu恢复lr
	//为什么elr_el2不在这里恢复?要在sysreg_restore_guest_state_vhe

	// Do not touch any register after this!
	eret	//这里跳转到elr_el2,也就是VCPU的PC,进入guest代码执行
/*
用户空间(EL0)通过 ioctl 进入 KVM 内核代码(EL1)。
内核代码(EL1)最终调用 __kvm_vcpu_run,准备好上下文后,通过 SMC/HVC 或跳转机制切换到 EL2。
在 EL2 下,执行 __guest_enter,完成虚拟机上下文切换,eret 进入 Guest(EL1/EL0)。
*/
	sb

/*sb 指令是 ARMv8 架构中的 “Speculation Barrier”(推测屏障)指令。
作用:
用于防止 CPU 执行推测性指令带来的安全隐患(如 Spectre 类漏洞)。
它会阻止指令流中在 sb 之前的所有内存访问被推测性地重排序到 sb 之后。
确保异常返回前后的执行环境不会被推测执行影响,提升安全性。
*/
__guest_exit
__guest_exit的实现:
- 从vcpu获取kvm_cpu_context对象(vcpu->kvm_cpu_context)。将guest上下文保存到kvm_cpu_context对象,guest的通用寄存器和sp_el0。
- 将从percpu获取kvm_hyp_ctxt对象,恢复host上下文,sp_el0和通用寄存器(当然包括lr/x30寄存器)。
- ret 跳转到__guest_enter的下一条指令,
exit_code=__guest_enter后的指令,此时以及回到hyp的C上下文。
// arch/arm64/kvm/hyp/entry.S
SYM_INNER_LABEL(__guest_exit, SYM_L_GLOBAL)
	// x0: return code
	// x1: vcpu
	// x2-x29,lr: vcpu regs
	// vcpu x0-x1 on the stack
0
	add	x1, x1, #VCPU_CONTEXT//x1指向vcpu的vcpu_context

	ALTERNATIVE(nop, SET_PSTATE_PAN(1), ARM64_HAS_PAN, CONFIG_ARM64_PAN)

	// Store the guest regs x2 and x3
	stp	x2, x3,   [x1, #CPU_XREG_OFFSET(2)]

	// Retrieve the guest regs x0-x1 from the stack
	ldp	x2, x3, [sp], #16	// x0, x1

	// Store the guest regs x0-x1 and x4-x17
	stp	x2, x3,   [x1, #CPU_XREG_OFFSET(0)]
	stp	x4, x5,   [x1, #CPU_XREG_OFFSET(4)]
	stp	x6, x7,   [x1, #CPU_XREG_OFFSET(6)]
	stp	x8, x9,   [x1, #CPU_XREG_OFFSET(8)]
	stp	x10, x11, [x1, #CPU_XREG_OFFSET(10)]
	stp	x12, x13, [x1, #CPU_XREG_OFFSET(12)]
	stp	x14, x15, [x1, #CPU_XREG_OFFSET(14)]
	stp	x16, x17, [x1, #CPU_XREG_OFFSET(16)]
//依次将 x0-x17 的值保存到 vcpu 的上下文结构体(VCPU_CONTEXT)对应偏移。
//这样做保证异常发生时,Guest 的所有通用寄存器都能被 Hypervisor 完整保存。
	// Store the guest regs x18-x29, lr
	save_callee_saved_regs x1

	// Store the guest's sp_el0
	save_sp_el0	x1, x2
//先保存vcpu上下文,在加载percpu绑定的变量上面的host cpu上下文,这个上下文是切换到guest前保存的。
	adr_this_cpu x2, kvm_hyp_ctxt, x3 //load cpu上找到切换前的上下文到x2,切换前是cpu上下文是Hypervisor的代码。

	// Macro ptrauth_switch_to_hyp format:
	// 	ptrauth_switch_to_hyp(guest cxt, host cxt, tmp1, tmp2, tmp3)
	// The below macro to save/restore keys is not implemented in C code
	// as it may cause Pointer Authentication key signing mismatch errors
	// when this feature is enabled for kernel code.
	ptrauth_switch_to_hyp x1, x2, x3, x4, x5

	// mte_switch_to_hyp(g_ctxt, h_ctxt, reg1)
	mte_switch_to_hyp x1, x2, x3

	// Restore hyp's sp_el0
	restore_sp_el0 x2, x3 //从x2里恢复sp_el0,hyp的C代码执行环境。
/*
host 可以el2内核和hyp,el0用户态
guest 可以el1内核,el0用户态
不管是guest还是host,只有一个用户异常级别sp_el0可用,因此要保存以及恢复。

vcpu->arch.ctxt.sp 保存 Guest 的 SP_EL0
kvm_hyp_ctxt.sp(per-CPU)保存 hyp/Host 的 SP_EL0,也就是qemu的栈。
*/
	// Now restore the hyp regs
	restore_callee_saved_regs x2 //从x2对象里恢复寄存器,包括lr。

	set_loaded_vcpu xzr, x2, x3

alternative_if ARM64_HAS_RAS_EXTN
	// If we have the RAS extensions we can consume a pending error
	// without an unmask-SError and isb. The ESB-instruction consumed any
	// pending guest error when we took the exception from the guest.
	mrs_s	x2, SYS_DISR_EL1
	str	x2, [x1, #(VCPU_FAULT_DISR - VCPU_CONTEXT)]
	cbz	x2, 1f
	msr_s	SYS_DISR_EL1, xzr
	orr	x0, x0, #(1<<ARM_EXIT_WITH_SERROR_BIT)
1:	ret
/*__guest_exit直接的返回值就是__guest_enter一次guest的返回值*/
整体上,可以把__guest_enter看做一个执行上下文切换并运行guest代码的函数。
我们在回到_kvm_arch_vcpu_ioctl_run来看,不管是___kvm_vcpu_run还是__kvm_vcpu_run_vhe,都有eret进入guest,从__guest_exit返回只有ret返回,也就是任然工作在el2。
nvhe严格的划分:host部分代码运行在el1,hyp部分运行el2。那么什么时候实现 hyp el2会到host el1的呢?答案就在kvm_call_hyp_ret宏,它的返回就代表从el2回到了el1,会单独开辟nvhe流程章节分析讲解。
3. Stage-2 地址翻译
host和guest上下文切换属于CPU虚拟化的知识范畴,stage-2地址翻译属于内存虚拟化的范畴,但是这两者紧密相关。所以在这里会简单的做一些介绍。
当CPU切换到guest后,从PC寄存器保存的地址取指运行,就涉及到度内存的访问。
在host用户空间分配的虚拟地址,作为虚拟机的物理地址,CPU是如何读取上面的数据并执行的呢?
// QEMU
ioctl(fd, KVM_CREATE_VM, type);//最终会调用kvm_init_stage2_mmu创建页表。
void *ram = mmap(NULL, 0x1000000, PROT_READ|PROT_WRITE, MAP_PRIVATE|MAP_ANONYMOUS, -1, 0);
// ram = 0x7f1234560000 (Host userspace VA),host用户空间分配的地址。
// 告诉 KVM:Guest 的 0x0 ~ 0x1000000 是 RAM
kvm_userspace_memory_region reg = {
.guest_phys_addr = 0x0,
.memory_size = 0x1000000,
.userspace_addr = (uint64_t)ram,
};
ioctl(vm_fd, KVM_SET_USER_MEMORY_REGION, ®);
// 此时 Host 物理页尚未分配(可能还在 swap 或 zero page)
kvm对象创建的时候,就会给S2页表对象创建,保证VTTBR_EL2不为空。
此时,我们将ELR_EL2 = 0x0,SCTLR_EL1.M = 0(关闭MMU,不启用S1翻译,所以不用判段地址是高还是低,不适用TTBR0_EL1/TTBR1_EL1),执行eret的时候,PC寄存器开始从0x0的物理虚拟物理地址开始读取。
PC = 0x0 (VA)
  ↓
Stage-1 (SCTLR_EL1.M=0,,通常 MMU 关闭,假设 Guest 尚未设置页表,如刚启动),
  → 不翻译。(不使用 Guest TTBR0_EL1/TTBR1_EL1 )
  → 此时 VA = IPA = 0x0
  ↓
Stage-2 (HCR_EL2.VM = 1,开启翻译)
  → 部件TLB未命中 → 页表walk发现PTE无效 → 触发Stage-2 Translation Fault → Trap到kvm EL2处理缺页。→ __guest_exit退出
    ...->直到kvm_arch_vcpu_ioctl_run->
        ->handle_exit->handle_trap_exceptions(处理ESR_ELx_EC_IABT_LOW异常)
        	->...->user_mem_abort(处理内存错误)->kvm_pgtable_stage2_map(实现填充页表项,刷新页表缓存)//在el2内处理完后handle_exit返回。
        ->kvm_arm_vcpu_enter_exit -> ...->__guest_enter //根据handle_exit返回值,决定继续进入guest执行。
  → IPA 0x0 已被你映射到 Host 的 ram 物理页(使用VTTBR_EL2页表寄存器)
  → 再次访问IPA=0x0,得到真实 PA
  ↓
从该物理页读取指令 → 成功!
如果开启Stage-1翻译,相当于KVM_SET_USER_MEMORY_REGION提供了物理地址(IPA)给guest EL1内核,guest内核负责管理物理内存,以及创建Stage-1的页表,就是内核正常的初始化物理内存的过程。guest的虚拟地址,都是要通过其 EL1内核分配。
关键数据结构和寄存器
kvm (虚拟机实例)
├── 内存管理
│   ├── kvm_memslots[] (内存插槽)
│   └── mmu_lock (MMU锁)
├── vCPU数组
│   └── kvm_vcpu[] (虚拟CPU)
│       ├── 用户空间接口
│       │   └── kvm_run (通信接口)
│       └── 架构特定状态
│           └── kvm_vcpu_arch
│               ├── CPU上下文
│               │   └── kvm_cpu_context
│               │       ├── regs (通用寄存器)
│               │       ├── fp_regs (FP/SIMD寄存器)
│               │       └── sys_regs (系统寄存器)
│               ├── 地址转换
│               │   └── kvm_s2_mmu *hw_mmu
│               │       ├── vmid (虚拟机ID)
│               │       ├── pgd_phys (页表物理地址)
│               │       └── pgt (页表结构)
│               ├── 虚拟外设
│               │   ├── vgic_cpu (虚拟中断控制器)
│               │   ├── timer (虚拟定时器)
│               │   └── pmu (性能监控单元)
│               └── 嵌套虚拟化
│                   └── *nested_mmus
└── 架构特定数据
    └── kvm_arch

Per-CPU Host状态
└── kvm_host_data[]
    └── host_ctxt (Host CPU上下文)
        ├── regs (Host寄存器)
        ├── fp_regs (Host FP状态)
        └── sys_regs (Host系统寄存器)
1. kvm - 虚拟机实例
文件位置: include/linux/kvm_host.h
关键字段:
struct kvm {
#ifdef KVM_HAVE_MMU_RWLOCK
    rwlock_t mmu_lock;
#else
    spinlock_t mmu_lock;
#endif
    struct mutex slots_lock;
    struct mutex slots_arch_lock;
    struct mm_struct *mm;               // 用户空间内存描述符
    unsigned long nr_memslot_pages;
    struct kvm_memslots __memslots[KVM_MAX_NR_ADDRESS_SPACES][2]; // 内存插槽
    struct kvm_vcpu *vcpus[KVM_MAX_VCPUS]; // vCPU数组
    struct kvm_arch arch;               // 架构特定数据
    atomic_t online_vcpus;             // 在线vCPU计数
    long vcpus_in_guest;                // 在guest中的vCPU数
};
主要作用:
- 代表一个完整的虚拟机实例
- 管理虚拟机的内存、设备和vCPU
- 提供虚拟机级别的配置和控制
2. kvm_vcpu - 虚拟CPU核心结构体
struct kvm_vcpu {
    struct kvm *kvm;                    // 所属虚拟机实例
    int cpu, vcpu_id, vcpu_idx;         // 物理CPU映射和虚拟ID
    struct kvm_run *run;                // 用户空间通信结构
    struct kvm_vcpu_arch arch;          // 架构特定状态
    struct kvm_vcpu_stat stat;          // 统计信息
    int mode;                           // 执行模式(IN_GUEST_MODE等)
    bool wants_to_run;                  // 运行意愿标记
    int preempted;                      // 抢占状态
    void *guest_debug;                  // 调试支持
};
主要作用:
- 代表一个虚拟CPU实例,是虚拟化的基本单位
- 管理vCPU的生命周期和调度
- 协调guest和host之间的状态切换
- 提供统计信息跟踪和性能监控
3. kvm_run - 用户空间通信接口
文件位置: include/uapi/linux/kvm.h
主要作用:
- 作为用户空间和内核空间KVM的通信桥梁
- 传递guest退出原因和处理请求
- 提供同步接口和数据交换
关键字段:
struct kvm_run {
    __u8 request_interrupt_window;      // 请求中断窗口
    __u8 immediate_exit;                // 立即退出标记
    __u8 padding1[6];
    __u32 exit_reason;                  // 退出原因
    __u8 ready_for_interrupt_injection; // 中断注入准备状态
    __u8 if_flag;                       // 中断标志
    __u16 flags;                        // 状态标志
    __u64 cr8;                          // x86 CR8寄存器
    __u64 apic_base;                    // APIC基地址
    // 架构特定的退出信息联合体
};
4. kvm_vcpu_arch - ARM架构特定的vCPU状态
文件位置: arch/arm64/include/asm/kvm_host.h
主要作用:
- 存储ARM架构特定的vCPU完整状态
- 包含guest的处理器上下文和虚拟化配置
- 管理ARM特定的虚拟化特性
关键字段:
struct kvm_vcpu_arch {
    struct kvm_cpu_context ctxt;        // CPU上下文(核心)
    void *sve_state;                    // SVE(可伸缩向量扩展)状态
    enum fp_type fp_type;               // 浮点类型
    struct kvm_s2_mmu *hw_mmu;          // 二级地址转换MMU
    u64 hcr_el2, hcrx_el2, mdcr_el2;    // 虚拟化控制寄存器
    struct kvm_vcpu_fault_info fault;  // 缺页错误信息
    struct vgic_cpu vgic_cpu;           // 虚拟GIC状态
    struct kvm_timer timer;             // 虚拟定时器
    struct kvm_pmu pmu;                 // 性能监控单元
    u64 trfcr_while_in_guest;          // 跟踪过滤器配置
    struct kvm_s2_mmu mmu;              // 二级MMU
    struct kvm_s2_mmu *nested_mmus;     // 嵌套虚拟化MMU
};
关键特性:
ctxt字段是上下文切换的核心hw_mmu指向实际使用的地址转换结构- 支持嵌套虚拟化(nested_mmus)
- 包含完整的虚拟外设状态(GIC、定时器、PMU)
5. kvm_cpu_context - CPU上下文状态
文件位置: arch/arm64/include/asm/kvm_host.h
主要作用:
- 存储完整的CPU寄存器状态
- 在上下文切换时保存和恢复处理器状态
- 作为guest和host状态切换的载体
关键字段:
struct kvm_cpu_context {
    struct user_pt_regs regs;           // 通用寄存器(x0-x30, sp, pc)
    u64 spsr_abt, spsr_und, spsr_irq, spsr_fiq;  // 异常状态寄存器
    struct user_fpsimd_state fp_regs;   // FP/SIMD寄存器
    u64 sys_regs[NR_SYS_REGS];          // 系统寄存器
    struct kvm_vcpu *__hyp_running_vcpu; // hypervisor运行中的vCPU
    u64 *vncr_array;                    // 嵌套虚拟化寄存器
};
寄存器组分类:
- 通用寄存器 (regs): x0-x30, sp, pc
- 异常状态寄存器: SPSR_ABT, SPSR_UND, SPSR_IRQ, SPSR_FIQ
- 浮点/SIMD寄存器 (fp_regs): V0-V31, FPSR, FPCR
- 系统寄存器 (sys_regs): SCTLR, TCR, TTBR等
6. kvm_host_data - Host状态管理
文件位置: arch/arm64/include/asm/kvm_host.h
主要作用:
- 管理hypervisor的host状态
- 提供Per-CPU数据存储
- 管理host的系统寄存器上下文
关键字段:
struct kvm_host_data {
#define KVM_HOST_DATA_FLAG_HAS_SPE            0
#define KVM_HOST_DATA_FLAG_HAS_TRBE           1
#define KVM_HOST_DATA_FLAG_TRBE_ENABLED       4
#define KVM_HOST_DATA_FLAG_EL1_TRACING_CONFIGURED  5
#define KVM_HOST_DATA_FLAG_VCPU_IN_HYP_CONTEXT   6
#define KVM_HOST_DATA_FLAG_L1_VNCR_MAPPED       7
#define KVM_HOST_DATA_FLAG_HAS_BRBE           8
    unsigned long flags;                 // 状态标志位
    struct kvm_cpu_context host_ctxt;   // host的CPU上下文
};
重要特性:
- Per-CPU数据结构,每个物理CPU一个实例
- 通过标志位管理各种硬件特性
host_ctxt保存host的完整状态
7. kvm_s2_mmu Stage2映射
文件位置: arch/arm64/include/asm/kvm_host.h
struct kvm_s2_mmu {
	struct kvm_vmid vmid;
	phys_addr_t	pgd_phys;       // PGD 物理地址
	struct kvm_pgtable *pgt;    // Stage2 页表
	int __percpu *last_vcpu_ran;// 每个 CPU 最后运行的 VCPU
	struct kvm_arch *arch;      // 架构特定数据
};
主要作用:
- 管理guest的二级地址转换(Stage 2 Translation)
- 实现内存虚拟化,隔离guest物理内存
- 管理虚拟地址到物理地址的映射
8. kvm_pgtable Stage2页表
文件位置: arch/arm64/include/asm/kvm_pgtable.h
struct kvm_pgtable {
    u32                            ia_bits;        // IPA 地址位数
    u32                            start_level;    // 起始页表级别
    kvm_pte_t                      *pgd;           // PGD 页表根指针
    struct kvm_pgtable_mm_ops     *mm_ops;        // 内存操作回调
    struct kvm_s2_mmu              *mmu;           // 关联的 MMU
    enum kvm_pgtable_stage2_flags  flags;          // 标志位
    kvm_pgtable_force_pte_cb_t    force_pte_cb;   // 强制 PTE 回调
};
参考文件:arch/arm64/kvm/arm.c, arch/arm64/kvm/hyp//switch.c, arch/arm64/kvm/hyp/entry.S
nVHE的调用过程
nVHE调用路径
nvhe的完整路径,host el1 -> hyp el2 ->host el1的过程。
[主机调用]: kvm_call_hyp_ret(__kvm_vcpu_run, vcpu)
     ↓
[展开为]: arm_smccc_1_1_hvc(KVM_HOST_SMCCC_FUNC(__kvm_vcpu_run), vcpu, &res)
     ↓
[执行]: hvc #0 (x0=KVM功能号, x1=vcpu)
     ↓
[异常处理]: host_el1_sync_vect → __host_hvc → __host_exit
     ↓
[调用处理]: handle_trap → handle_host_hcall → host_hcall[KVM_FUNC_IDX] → handle___kvm_vcpu_run → __kvm_vcpu_run(vcpu)
     ↓
[返回]: __host_exit(vcpu) ->eret
     ↓
[返回]: kvm_call_hyp_ret
__kvm_vcpu_run内恢复host el1的 pc 寄存器,__host_exit最后ret,后续会讲到。
kvm_call_hyp_ret展开
{
     struct arm_smccc_res res;

     // KVM_HOST_SMCCC_FUNC(__kvm_vcpu_run) 展开为 (ARM_SMCCC_OWNER_KVM << ARM_SMCCC_OWNER_SHIFT) |      __KVM_HOST_SMCCC_FUNC___kvm_vcpu_run
     // 假设 __KVM_HOST_SMCCC_FUNC___kvm_vcpu_run = 19
     typeof(vcpu) __a1 = vcpu;                           // arg1 = vcpu
     struct arm_smccc_res *___res = &res;                // ___res = &res
     register unsigned long arg0 asm("r0") = (u32)((ARM_SMCCC_OWNER_KVM << ARM_SMCCC_OWNER_SHIFT) | 19); // arg0=function ID
     register typeof(vcpu) arg1 asm("r1") = __a1;        // arg1=vcpu

     // 汇编部分
     register unsigned long r0 asm("r0");      // 用于接收返回值
     register unsigned long r1 asm("r1");      // 用于接收返回值
     register unsigned long r2 asm("r2");      // 用于接收返回值
     register unsigned long r3 asm("r3");      // 用于接收返回值

     asm volatile("hvc     #0\n :                // SMCCC_HVC_INST = "hvc  #0"
                  "=r" (r0), "=r" (r1), "=r" (r2), "=r" (r3)
                  : "r" (arg0), "r" (arg1)    // function ID and vcpu
                  : "memory");

     if (___res) {
         *___res = (typeof(*___res)){r0, r1, r2, r3};   // 将返回值存入res结构体
     }

     WARN_ON(res.a0 != SMCCC_RET_SUCCESS);    // 检查返回状态

     ret = res.a1;  // 返回函数执行结果
 }
hyp异常向量表映射
__kvm_hyp_host_vector的结构是这样的(每个异常类型对应一个64字节的槽):
__kvm_hyp_host_vector:  // 基地址 (VBAR_EL2)
├─ [0x000] Synchronous EL2t     → invalid_host_el2_vect
├─ [0x080] IRQ EL2t             → invalid_host_el2_vect
├─ [0x100] FIQ EL2t             → invalid_host_el2_vect
├─ [0x180] Error EL2t           → invalid_host_el2_vect
├─ [0x200] Synchronous EL2h     → invalid_host_el2_vect
├─ [0x280] IRQ EL2h             → invalid_host_el2_vect
├─ [0x300] FIQ EL2h             → invalid_host_el2_vect
├─ [0x380] Error EL2h           → invalid_host_el2_vect
├─ [0x400] Synchronous 64-bit EL1/EL0 → host_el1_sync_vect
├─ [0x480] IRQ 64-bit EL1/EL0   → invalid_host_el1_vect
├─ [0x500] FIQ 64-bit EL1/EL0   → invalid_host_el1_vect
├─ [0x580] Error 64-bit EL1/EL0 → invalid_host_el1_vect
├─ [0x600] Synchronous 32-bit EL1/EL0 → host_el1_sync_vect
├─ [0x680] IRQ 32-bit EL1/EL0   → invalid_host_el1_vect
├─ [0x700] FIQ 32-bit EL1/EL0   → invalid_host_el1_vect
├─ [0x780] Error 32-bit EL1/EL0 → invalid_host_el1_vect
中断向量执行流程
EL1执行: hvc #0 (功能号在x0中)
↓
ARM处理器检测到HVC #0异常
↓
根据ESR_EL2确定异常来源为EL1/EL0
↓
查找向量表: VBAR_EL2 + 0x400 (Synchronous 64-bit EL1/EL0的偏移)
↓
跳转到: host_el1_sync_vect (定义在host.S中)
↓
host_el1_sync_vect宏执行:
         stp x0, x1, [sp, #-16]!    // 保存x0, x1到栈
         mrs x0, esr_el2            // 读取ESR
         ubfx x0, x0, #ESR_ELx_EC_SHIFT, #ESR_ELx_EC_WIDTH  // 提取异常类
         cmp x0, #ESR_ELx_EC_HVC64  // 检查是否为HVC64异常类
         b.eq __host_hvc            // 如果是HVC64,跳转到__host_hvc
         b __host_exit              // 否则,跳转到__host_exit
↓
执行: __host_hvc (在host.S中)
host_el1_sync_vect中断向量的核心是判断是否为HVC64异常。x0是功能号,x1是参数,如vpcu指针。
压栈是为了传递给__host_hvc。
异常处理分发
__host_hvc根据x0记录的kvm功能号是判断是hvc还是其他调用,x0=__KVM_HOST_SMCCC_FUNC___kvm_vcpu_run。
SYM_FUNC_START(__host_hvc)
	ldp	x0, x1, [sp]		// Don't fixup the stack yet

	/* No stub for you, sonny Jim */
alternative_if ARM64_KVM_PROTECTED_MODE//KVM_保护模式直接退出
	b	__host_exit
alternative_else_nop_endif

	/* Check for a stub HVC call */
	cmp	x0, #HVC_STUB_HCALL_NR //成立
	b.hs	__host_exit //普通kvm hvc调用。

	add	sp, sp, #16
	/*
	 * Compute the idmap address of __kvm_handle_stub_hvc and
	 * jump there.
	 *
	 * Preserve x0-x4, which may contain stub parameters.
	 */
	adr_l	x5, __kvm_handle_stub_hvc
	hyp_pa	x5, x6
	br	x5
SYM_FUNC_END(__host_hvc)
__host_exit的核心功能就是保存host上下文,从perCPU变量获取指针到x0寄存器,将当前的各种寄存器存这个上下文。在进入异常和中断向量之前,这些寄存器属于el1 host在用,而中断向量中间也只是少量的使用寄存器,且做到了用后恢复。
到然后进入handle_trap,执行具体的hvc功能函数调用,需要host的上下文作为参数提供功能号。
handle_trap
保存host上下文,进入到hyp上下文
__host_exit先保存host上下文,handle_trap执行hyp功能号对应的函数,返回后,继续执行到eret返回host el1。
SYM_FUNC_START(__host_exit)
	get_host_ctxt	x0, x1

	/* Store the host regs x2 and x3 */
	stp	x2, x3,   [x0, #CPU_XREG_OFFSET(2)]

	/* Retrieve the host regs x0-x1 from the stack */
	ldp	x2, x3, [sp], #16	// x0, x1

	/* Store the host regs x0-x1 and x4-x17 */
	stp	x2, x3,   [x0, #CPU_XREG_OFFSET(0)]
	stp	x4, x5,   [x0, #CPU_XREG_OFFSET(4)]
	stp	x6, x7,   [x0, #CPU_XREG_OFFSET(6)]
	stp	x8, x9,   [x0, #CPU_XREG_OFFSET(8)]
	stp	x10, x11, [x0, #CPU_XREG_OFFSET(10)]
	stp	x12, x13, [x0, #CPU_XREG_OFFSET(12)]
	stp	x14, x15, [x0, #CPU_XREG_OFFSET(14)]
	stp	x16, x17, [x0, #CPU_XREG_OFFSET(16)]

	/* Store the host regs x18-x29, lr */
	save_callee_saved_regs x0

	/* Save the host context pointer in x29 across the function call */
	mov	x29, x0

#ifdef CONFIG_ARM64_PTR_AUTH_KERNEL
alternative_if_not ARM64_HAS_ADDRESS_AUTH
b __skip_pauth_save
alternative_else_nop_endif

alternative_if ARM64_KVM_PROTECTED_MODE
	/* Save kernel ptrauth keys. */
	add x18, x29, #CPU_APIAKEYLO_EL1
	ptrauth_save_state x18, x19, x20

	/* Use hyp keys. */
	adr_this_cpu x18, kvm_hyp_ctxt, x19
	add x18, x18, #CPU_APIAKEYLO_EL1
	ptrauth_restore_state x18, x19, x20
	isb
alternative_else_nop_endif
__skip_pauth_save:
#endif /* CONFIG_ARM64_PTR_AUTH_KERNEL */

	bl	handle_trap

__host_enter_restore_full:
	/* Restore kernel keys. */
#ifdef CONFIG_ARM64_PTR_AUTH_KERNEL
alternative_if_not ARM64_HAS_ADDRESS_AUTH
b __skip_pauth_restore
alternative_else_nop_endif

alternative_if ARM64_KVM_PROTECTED_MODE
	add x18, x29, #CPU_APIAKEYLO_EL1
	ptrauth_restore_state x18, x19, x20
alternative_else_nop_endif
__skip_pauth_restore:
#endif /* CONFIG_ARM64_PTR_AUTH_KERNEL */

	/* Restore host regs x0-x17 */
	ldp	x0, x1,   [x29, #CPU_XREG_OFFSET(0)]
	ldp	x2, x3,   [x29, #CPU_XREG_OFFSET(2)]
	ldp	x4, x5,   [x29, #CPU_XREG_OFFSET(4)]
	ldp	x6, x7,   [x29, #CPU_XREG_OFFSET(6)]

	/* x0-7 are use for panic arguments */
__host_enter_for_panic:
	ldp	x8, x9,   [x29, #CPU_XREG_OFFSET(8)]
	ldp	x10, x11, [x29, #CPU_XREG_OFFSET(10)]
	ldp	x12, x13, [x29, #CPU_XREG_OFFSET(12)]
	ldp	x14, x15, [x29, #CPU_XREG_OFFSET(14)]
	ldp	x16, x17, [x29, #CPU_XREG_OFFSET(16)]

	/* Restore host regs x18-x29, lr */
	restore_callee_saved_regs x29

	/* Do not touch any register after this! */
__host_enter_without_restoring:
	eret  //使用eret指令返回到主机
	sb
SYM_FUNC_END(__host_exit)
在handle_trap里进入到handle_host_hcall分支。
arch/arm64/kvm/hyp/nvhe/hyp-main.c
void handle_trap(struct kvm_cpu_context *host_ctxt)
{
	u64 esr = read_sysreg_el2(SYS_ESR);

	switch (ESR_ELx_EC(esr)) {
	case ESR_ELx_EC_HVC64:
		handle_host_hcall(host_ctxt);
		break;
	case ESR_ELx_EC_SMC64:
		handle_host_smc(host_ctxt);
		break;
	case ESR_ELx_EC_IABT_LOW:
	case ESR_ELx_EC_DABT_LOW:
		handle_host_mem_abort(host_ctxt);
		break;
	default:
		BUG();
	}
}
从host_ctxt取,HVC功能号,然后找到对应的调用函数。
#define cpu_reg(ctxt, r)	(ctxt)->regs.regs[r]
#define DECLARE_REG(type, name, ctxt, reg)					\
				__always_unused int ___check_reg_ ## reg;	\
				type name = (type)cpu_reg(ctxt, (reg))


static void handle_host_hcall(struct kvm_cpu_context *host_ctxt)
{
   // 从host_ctxt的x0寄存器获取功能号放到id
   // cpu_reg(host_ctxt, 0) 本质上是从host_ctxt->regs.regs[0]获取值
   // 这个值就是HVC调用时x0寄存器中的功能号

	DECLARE_REG(unsigned long, id, host_ctxt, 0);
	unsigned long hcall_min = 0;
	hcall_t hfn;

	/*
	 * If pKVM has been initialised then reject any calls to the
	 * early "privileged" hypercalls. Note that we cannot reject
	 * calls to __pkvm_prot_finalize for two reasons: (1) The static
	 * key used to determine initialisation must be toggled prior to
	 * finalisation and (2) finalisation is performed on a per-CPU
	 * basis. This is all fine, however, since __pkvm_prot_finalize
	 * returns -EPERM after the first call for a given CPU.
	 */
	if (static_branch_unlikely(&kvm_protected_mode_initialized))
		hcall_min = __KVM_HOST_SMCCC_FUNC___pkvm_prot_finalize;

	id &= ~ARM_SMCCC_CALL_HINTS;
	id -= KVM_HOST_SMCCC_ID(0);

	if (unlikely(id < hcall_min || id >= ARRAY_SIZE(host_hcall)))
		goto inval;

	hfn = host_hcall[id];//先索引到函数
	if (unlikely(!hfn))
		goto inval;

	cpu_reg(host_ctxt, 0) = SMCCC_RET_SUCCESS;
	hfn(host_ctxt);//在跳转到函数

	return;
inval:
	cpu_reg(host_ctxt, 0) = SMCCC_RET_NOT_SUPPORTED;
}
对应的函数是__kvm_vcpu_run,展开是handle___kvm_vcpu_run,host_hcall数组存储函数指针,索引值__KVM_HOST_SMCCC_FUNC_##x拼接的调用号。
最终在handle___kvm_vcpu_run内调用__kvm_vcpu_run。
#define HANDLE_FUNC(x)	[__KVM_HOST_SMCCC_FUNC_##x] = (hcall_t)handle_##x

static const hcall_t host_hcall[] = {
	/* ___kvm_hyp_init */
	HANDLE_FUNC(__pkvm_init),
	HANDLE_FUNC(__pkvm_create_private_mapping),
	HANDLE_FUNC(__pkvm_cpu_set_vector),
	HANDLE_FUNC(__kvm_enable_ssbs),
	HANDLE_FUNC(__vgic_v3_init_lrs),
	HANDLE_FUNC(__vgic_v3_get_gic_config),
	HANDLE_FUNC(__pkvm_prot_finalize),

	HANDLE_FUNC(__pkvm_host_share_hyp),
	HANDLE_FUNC(__pkvm_host_unshare_hyp),
	HANDLE_FUNC(__pkvm_host_share_guest),
	HANDLE_FUNC(__pkvm_host_unshare_guest),
	HANDLE_FUNC(__pkvm_host_relax_perms_guest),
	HANDLE_FUNC(__pkvm_host_wrprotect_guest),
	HANDLE_FUNC(__pkvm_host_test_clear_young_guest),
	HANDLE_FUNC(__pkvm_host_mkyoung_guest),
	HANDLE_FUNC(__kvm_adjust_pc),
	HANDLE_FUNC(__kvm_vcpu_run),
	HANDLE_FUNC(__kvm_flush_vm_context),
	HANDLE_FUNC(__kvm_tlb_flush_vmid_ipa),
	HANDLE_FUNC(__kvm_tlb_flush_vmid_ipa_nsh),
	HANDLE_FUNC(__kvm_tlb_flush_vmid),
	HANDLE_FUNC(__kvm_tlb_flush_vmid_range),
	HANDLE_FUNC(__kvm_flush_cpu_context),
	HANDLE_FUNC(__kvm_timer_set_cntvoff),
	HANDLE_FUNC(__vgic_v3_save_vmcr_aprs),
	HANDLE_FUNC(__vgic_v3_restore_vmcr_aprs),
	HANDLE_FUNC(__pkvm_reserve_vm),
	HANDLE_FUNC(__pkvm_unreserve_vm),
	HANDLE_FUNC(__pkvm_init_vm),
	HANDLE_FUNC(__pkvm_init_vcpu),
	HANDLE_FUNC(__pkvm_teardown_vm),
	HANDLE_FUNC(__pkvm_vcpu_load),
	HANDLE_FUNC(__pkvm_vcpu_put),
	HANDLE_FUNC(__pkvm_tlb_flush_vmid),
};

static void handle___kvm_vcpu_run(struct kvm_cpu_context *host_ctxt)
{
	DECLARE_REG(struct kvm_vcpu *, host_vcpu, host_ctxt, 1);
	int ret;

	if (unlikely(is_protected_kvm_enabled())) {
		struct pkvm_hyp_vcpu *hyp_vcpu = pkvm_get_loaded_hyp_vcpu();

		/*
		 * KVM (and pKVM) doesn't support SME guests for now, and
		 * ensures that SME features aren't enabled in pstate when
		 * loading a vcpu. Therefore, if SME features enabled the host
		 * is misbehaving.
		 */
		if (unlikely(system_supports_sme() && read_sysreg_s(SYS_SVCR))) {
			ret = -EINVAL;
			goto out;
		}

		if (!hyp_vcpu) {
			ret = -EINVAL;
			goto out;
		}

		flush_hyp_vcpu(hyp_vcpu);

		ret = __kvm_vcpu_run(&hyp_vcpu->vcpu);

		sync_hyp_vcpu(hyp_vcpu);
	} else {
		struct kvm_vcpu *vcpu = kern_hyp_va(host_vcpu);

		/* The host is fully trusted, run its vCPU directly. */
		fpsimd_lazy_switch_to_guest(vcpu);
		ret = __kvm_vcpu_run(vcpu);
		fpsimd_lazy_switch_to_host(vcpu);
	}
out:
	cpu_reg(host_ctxt, 1) =  ret;
}
__kvm_vcpu_run上下文切换前的准备,如果要切换到guest,则__sysreg_restore_state_nvhe(guest_ctxt);将guest的pc寄存器写elr寄存器,方便__enter_guest eret进入到guest代码执行。
当guest陷入异常后,__enter_exit只是ret返回当前代码仍然在el2级别,只有在退出__kvm_vcpu_run 前,调用__sysreg_restore_state_nvhe(host_ctxt),将host 的pc寄存器写入到elr寄存,方便后续返回到host el1状态,这一点是nvhe独有的。
当__kvm_vcpu_run层层返回,直到__host_exit里的handle_trap返回,继续执行到eret,最终从__host_exit返回到host el1,页就是kvm_call_hyp_ret展开后hvc调用后的那个指令,宏观上可以认为是kvm_call_hyp_ret返回后,从el2回到host el1。
在hyp里切换host和guest状态
/* Switch to the guest for legacy non-VHE systems */
int __kvm_vcpu_run(struct kvm_vcpu *vcpu)
{
	struct kvm_cpu_context *host_ctxt;
	struct kvm_cpu_context *guest_ctxt;
	struct kvm_s2_mmu *mmu;
	bool pmu_switch_needed;
	u64 exit_code;

	host_ctxt = host_data_ptr(host_ctxt);
	host_ctxt->__hyp_running_vcpu = vcpu;
	guest_ctxt = &vcpu->arch.ctxt;

	__sysreg_save_state_nvhe(host_ctxt);


	/*
	 * We must restore the 32-bit state before the sysregs, thanks
	 * to erratum #852523 (Cortex-A57) or #853709 (Cortex-A72).
	 *
	 * Also, and in order to be able to deal with erratum #1319537 (A57)
	 * and #1319367 (A72), we must ensure that all VM-related sysreg are
	 * restored before we enable S2 translation.
	 */
	__sysreg32_restore_state(vcpu);
	__sysreg_restore_state_nvhe(guest_ctxt);

	mmu = kern_hyp_va(vcpu->arch.hw_mmu);
	__load_stage2(mmu, kern_hyp_va(mmu->arch));
	__activate_traps(vcpu);

	do {
		/* Jump in the fire! */
		exit_code = __guest_enter(vcpu);

		/* And we're baaack! */
	} while (fixup_guest_exit(vcpu, &exit_code));

	__sysreg_save_state_nvhe(guest_ctxt);

	/*
	 * Same thing as before the guest run: we're about to switch
	 * the MMU context, so let's make sure we don't have any
	 * ongoing EL1&0 translations.
	 */

	__deactivate_traps(vcpu);
	__load_host_stage2();

	__sysreg_restore_state_nvhe(host_ctxt);

	return exit_code;
}
在hyp返回前恢复ELR
__sysreg_restore_state_nvhe将ctxt里记录的PC寄存器写入ELR寄存,将pstate写入SPSR寄存器,eret就回到了host el1。
void __sysreg_restore_state_nvhe(struct kvm_cpu_context *ctxt)
{
	u64 midr = ctxt_midr_el1(ctxt);

	__sysreg_restore_el1_state(ctxt, midr, ctxt_sys_reg(ctxt, MPIDR_EL1));
	__sysreg_restore_common_state(ctxt);
	__sysreg_restore_user_state(ctxt);
	__sysreg_restore_el2_return_state(ctxt);
}


static inline void __sysreg_restore_el2_return_state(struct kvm_cpu_context *ctxt)
{
	u64 pstate = to_hw_pstate(ctxt);
	u64 mode = pstate & PSR_AA32_MODE_MASK;
	u64 vdisr;

	/*
	 * Safety check to ensure we're setting the CPU up to enter the guest
	 * in a less privileged mode.
	 *
	 * If we are attempting a return to EL2 or higher in AArch64 state,
	 * program SPSR_EL2 with M=EL2h and the IL bit set which ensures that
	 * we'll take an illegal exception state exception immediately after
	 * the ERET to the guest.  Attempts to return to AArch32 Hyp will
	 * result in an illegal exception return because EL2's execution state
	 * is determined by SCR_EL3.RW.
	 */
	if (!(mode & PSR_MODE32_BIT) && mode >= PSR_MODE_EL2t)
		pstate = PSR_MODE_EL2h | PSR_IL_BIT;

	write_sysreg_el2(ctxt->regs.pc,			SYS_ELR);
	write_sysreg_el2(pstate,			SYS_SPSR);

	if (!cpus_have_final_cap(ARM64_HAS_RAS_EXTN))
		return;

	if (!vserror_state_is_nested(ctxt_to_vcpu(ctxt)))
		vdisr = ctxt_sys_reg(ctxt, DISR_EL1);
	else if (ctxt_has_ras(ctxt))
		vdisr = ctxt_sys_reg(ctxt, VDISR_EL2);
	else
		vdisr = 0;

	write_sysreg_s(vdisr, SYS_VDISR_EL2);
}
SPDX
SPDX(Software Package Data Exchange)是一种文件格式,用于记录有关分发给定计算机软件的软件许可证的信息。SPDX 是由 SPDX 工作组编写的,该工作组代表了 20 多个不同的组织,由 Linux 基金会所支持。
简单的说,就是简化授权说明。
reuse
该工具用于在文件头添加SPDX格式的版权与license。
官方用例,init初始reuse,download下载license,addheader添加license到文件头,addheader会根据文件类型自动添加注释,最后reuse lint检测。

#新建项目
git clone -b noncompliant https://github.com/fsfe/reuse-example.git

#初始化,生成文件`.reuse/dep5`
pip3 install reuse
cd reuse-example && reuse init

#下载协议放到LICENSES/GPL-3.0-or-later.txt,reuse download --all 下载所有
reuse download GPL-3.0-or-later CC0-1.0

#添加所有文件,不想添加的文件加入.gitignore
reuse addheader --copyright="Jane Doe <jane@example.com>" --license="GPL-3.0-or-later" src/main.c Makefile README.md

reuse addheader --copyright="Jane Doe <jane@example.com>" --license="GPL-3.0-or-later" --force-dot-license img/cat.jpg img/dog.jpg

reuse addheader --copyright="Jane Doe <jane@example.com>" --license="CC0-1.0" .gitignore

#检测合规,会列举未授权的文件,最终要看到`Congratulations!`才行。
reuse lint
开源协议分类
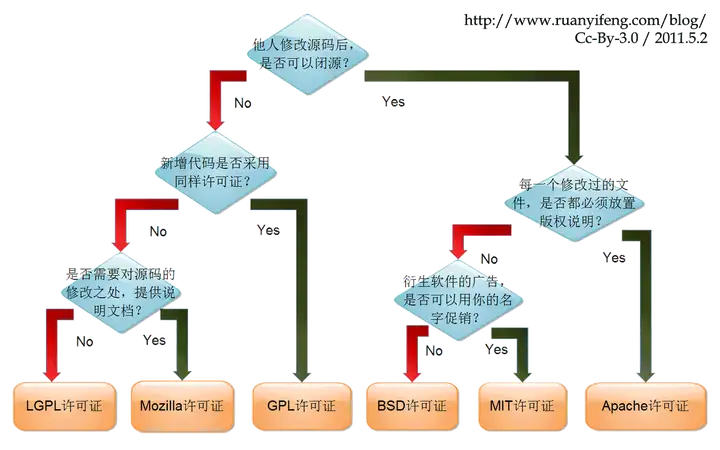
参考:https://reuse.software/tutorial/
LVGL
在linux下使用lvgl编写gui程序,使用lv_port_linux编译出动态库,简化在linux的开发环境流程。
制作Debian包
1.安装环境
sudo apt update
sudo apt install pkg-config
sudo apt install libwayland-dev libxkbcommon-dev libwayland-bin wayland-protocols libdrm-dev
2.修改lv_port_linux的一些默认配置
CMakeLists.txt,,方便编译动态库。
 # Link LVGL with external dependencies - Modern CMake/CMP0079 allows this
-target_link_libraries(lvgl PUBLIC ${PKG_CONFIG_LIB} m pthread)
+target_link_libraries(lvgl PUBLIC ${PKG_CONFIG_LIB} m pthread rt)
编译开关
LV_USE_PRIVATE_API,打包dev开发包的时候,私有头文件也要包含,否则会找不到头文件。
LV_USE_WAYLAND,启用wayland后端
LV_WAYLAND_WINDOW_DECORATIONS,开启这个,可以使得wayland窗口管理器管理app,否则app无法拖动。
LV_USE_LINUX_DRM,使用DRM后端
 /** Include `lvgl_private.h` in `lvgl.h` to access internal data and functions by default */
 #ifndef LV_USE_PRIVATE_API
-    #define LV_USE_PRIVATE_API  0
+    #define LV_USE_PRIVATE_API  1
 #endif


 /** Use Wayland to open a window and handle input on Linux or BSD desktops */
-#define LV_USE_WAYLAND          0
+#define LV_USE_WAYLAND          1
 #if LV_USE_WAYLAND

/**< When LV_WAYLAND_USE_DMABUF is disabled, only LV_DISPLAY_RENDER_MODE_PARTIAL is supported*/
-    #define LV_WAYLAND_WINDOW_DECORATIONS   0    /**< Draw client side window decorations only necessary on Mutter/GNOME. Not supported using DMABUF*/
+    #define LV_WAYLAND_WINDOW_DECORATIONS   1    /**< Draw client side window decorations only necessary on Mutter/GNOME. Not supported using DMABUF*/
     #define LV_WAYLAND_WL_SHELL             0    /**< Use the legacy wl_shell protocol instead of the default XDG shell*/
 #endif

 /** Driver for /dev/dri/card */
-#define LV_USE_LINUX_DRM        0
+#define LV_USE_LINUX_DRM        1

 #if LV_USE_LINUX_DRM
3.创建Debian构建文件
cd lv_port_linux && mkdir -p debian && cd debian
添加control文件
Source: lvgl
Section: libs
Priority: optional
Maintainer: LVGL Maintainer <maintainer@example.com>
Build-Depends: debhelper-compat (= 13), cmake, pkg-config, libwayland-dev, wayland-protocols, libxkbcommon-dev, libdrm-dev
Standards-Version: 4.6.2
Homepage: https://lvgl.io

Package: liblvgl9
Architecture: any
Depends: ${shlibs:Depends}, ${misc:Depends}
Description: LittlevGL runtime library
 LVGL graphics library runtime shared objects.

Package: liblvgl-dev
Architecture: any
Depends: liblvgl9 (= ${binary:Version}), ${misc:Depends}
Description: LittlevGL development files (headers, pkg-config)
 Development headers, shared libs and pkg-config for LVGL.
添加rules
#!/usr/bin/make -f
export DH_VERBOSE=1

%:
	dh $@ --buildsystem=cmake

#编译动态库
override_dh_auto_configure:
	# 可选:若需从 lv_conf.defaults 生成 lv_conf.h
	# python3 lvgl/scripts/generate_lv_conf.py .
	bash ./scripts/gen_wl_protocols.sh ./protocols
	# 解决 Wayland 协议生成代码中符号可见性为 hidden 导致 DSO 链接失败
	sed -i 's/^#define WL_PRIVATE __attribute__ ((visibility("hidden")))/#define WL_PRIVATE/' ./protocols/wayland_xdg_shell.c || true
	dh_auto_configure --builddirectory=build -- \
	  -DCMAKE_INSTALL_PREFIX=/usr \
	  -DBUILD_SHARED_LIBS=ON \
	  -DLIB_INSTALL_DIR=lib/${DEB_HOST_MULTIARCH} \
	  -DCMAKE_C_FLAGS='-DWL_PRIVATE=' \
	  -DCMAKE_EXE_LINKER_FLAGS='-Wl,--export-dynamic' \
	  -DLV_BUILD_EXAMPLES=ON \
	  -DLV_BUILD_DEMOS=ON

override_dh_auto_build:
	# Wayland scanner generates hidden symbols; neutralize before linking
	sed -i 's/^#define WL_PRIVATE __attribute__ ((visibility("hidden")))/#define WL_PRIVATE/' build/protocols/wayland_xdg_shell.c || true
	dh_auto_build --builddirectory=build -- -j$(nproc)

override_dh_auto_install:
	dh_auto_install --builddirectory=build --destdir=$(CURDIR)/debian/tmp
	# 等同于:DESTDIR=$(CURDIR)/debian/tmp cmake --install build

override_dh_auto_clean:
	# 保持与 out-of-source 一致的清理
	dh_auto_clean --builddirectory=build || true

override_dh_auto_test:
添加install文件
liblvgl9.install
usr/lib/*/liblvgl.so.*
usr/lib/*/liblvgl_demos.so.*
usr/lib/*/liblvgl_examples.so.*
usr/lib/*/liblvgl_thorvg.so.*
liblvgl-dev.install
usr/include/lvgl/
usr/share/pkgconfig/lvgl.pc
usr/lib/*/liblvgl.so
usr/lib/*/liblvgl_demos.so
usr/lib/*/liblvgl_examples.so
usr/lib/*/liblvgl_thorvg.so
usr/lib/liblvgl_linux.a
liblvgl_linux.a为什么不改成动态库?
-
目标在 CMake 中被明确声明为 STATIC:项目把平台封装/后端适配层做成了内部静态库(add_library(lvgl_linux STATIC …)),默认不会随 -DBUILD_SHARED_LIBS=ON 变成动态库。要修改,则会大量的地方修改适配。
-
仅供内部链接、非稳定 ABI:lvgl_linux 属于本仓库的“Linux 适配层”,主要被可执行程序或 liblvgl.so 内部使用,没承诺对外 ABI 稳定,不适合作为独立 .so 提供。
-
Wayland 生成代码的符号可见性问题:wayland-scanner 生成的 wayland_xdg_shell.c 使用 WL_PRIVATE 把接口标记为隐藏,直接做成 .so 会出现“hidden symbol is referenced by DSO”的链接问题,需要额外处理(我们在打包时通过 -DWL_PRIVATE= 和 –export-dynamic 才解决)。
-
避免循环依赖与依赖膨胀:如果把 lvgl_linux 做成共享库,很容易与 liblvgl.so、liblvgl_examples.so、liblvgl_demos.so 形成相互引用,导致复杂的运行时依赖和 shlibdeps 噪音。当前方案是把对外 .so 限定在核心和演示库,其它平台层静态链接使用。
liblvgl.so 和 liblvgl_linux.a 的区别?
liblvgl.so- LVGL 核心库
主要功能:
- LVGL 核心功能:包含所有 LVGL 的核心 API 和功能
- 对象系统:lv_obj_* 系列函数,如 lv_obj_create, lv_obj_add_flag 等
- 绘图系统:lv_draw_* 系列函数,如 lv_draw_triangle, lv_draw_triangle_dsc_init 等
- 字体系统:lv_font_* 系列函数和字体数据,如 lv_font_montserrat_24 等
- 显示驱动接口:lv_linux_drm_create, lv_wayland_window_create 等 Linux 特定驱动函数
- 输入设备接口:lv_indev_* 系列函数
- 组管理:lv_group_* 系列函数
liblvgl_linux.a - Linux 平台特定库
主要功能:
- 驱动后端管理:driver_backends_* 系列函数
- 后端初始化:backend_init_* 系列函数
- Wayland 协议接口:包含 Wayland XDG 协议的接口定义
- 平台特定实现:Linux 特定的驱动初始化和运行循环
3.构建deb包
cd lv_port_linux/
sudo apt build-dep .
dpkg-buildpackage -us -uc -tc  -b
生成三个包:
liblvgl9_9.3.0-1_amd64.deb,带动态库。
liblvgl-dev_9.3.0-1_amd64.deb,带头文件和liblvgl_linux.a,里面的动态库链接到liblvgl9的动态库。
liblvgl9-dbgsym_9.3.0-1_amd64.deb,带动态库调试符号。
理论上来说,开发接口是固定的,因此liblvgl-dev名字中是不带版本9,而提供的动态库liblvgl9则需要带版本9,最新liblvgl-dev通过对liblvgl9的依赖,保证liblvgl-dev可以使用新的库。
4.编译测试
先安装开发环境
sudo dpkg -i ../liblvgl9_9.3.0-1_amd64.deb ../liblvgl-dev_9.3.0-1_amd64.deb
进入example编译例子
cd lv_port_linux/example/
cmake -B build -S .
make -C build -j
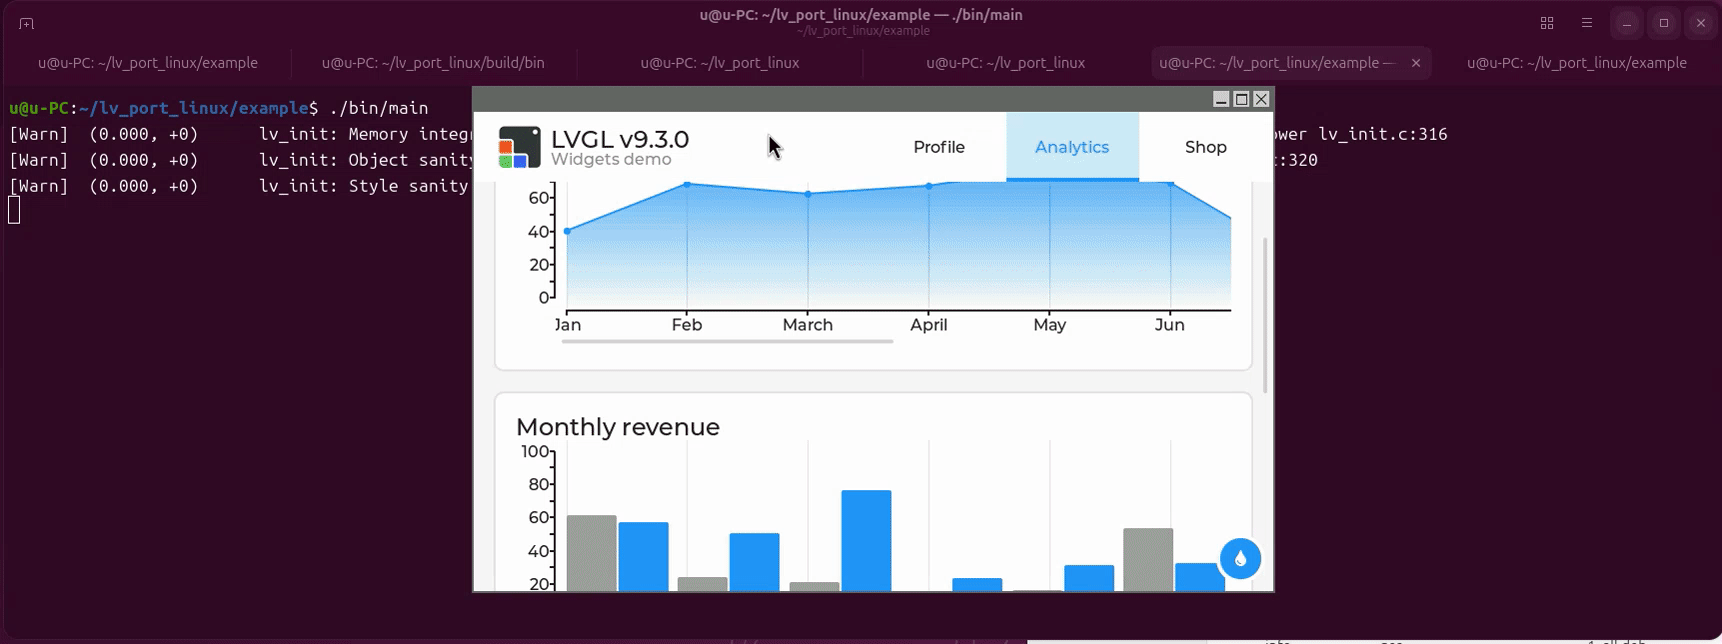
#运行例子
./bin/main
Build Zig
源码编译zig
添加llvm18的源
zig要求这个版本
# uos v20
deb http://apt.llvm.org/buster/ llvm-toolchain-buster main
deb-src http://apt.llvm.org/buster/ llvm-toolchain-buster main
# 18
deb http://apt.llvm.org/buster/ llvm-toolchain-buster-18 main
deb-src http://apt.llvm.org/buster/ llvm-toolchain-buster-18 main
# 19
deb http://apt.llvm.org/buster/ llvm-toolchain-buster-19 main
deb-src http://apt.llvm.org/buster/ llvm-toolchain-buster-19 main

# deepin v23
deb http://apt.llvm.org/bookworm/ llvm-toolchain-bookworm main
deb-src http://apt.llvm.org/bookworm/ llvm-toolchain-bookworm main
# 18
deb http://apt.llvm.org/bookworm/ llvm-toolchain-bookworm-18 main
deb-src http://apt.llvm.org/bookworm/ llvm-toolchain-bookworm-18 main
# 19
deb http://apt.llvm.org/bookworm/ llvm-toolchain-bookworm-19 main
deb-src http://apt.llvm.org/bookworm/ llvm-toolchain-bookworm-19 main
https://apt.llvm.org/
wget -qO- https://apt.llvm.org/llvm-snapshot.gpg.key | sudo tee /etc/apt/trusted.gpg.d/apt.llvm.org.asc
https://apt.llvm.org/
配置编译环境
sudo apt install -y build-essential cmake clang-18 libclang-18-dev libclang-cpp18-dev llvm-18 llvm-18-dev lld-18 liblld-18-dev libpolly-18-dev libllvm18
alias llvm-config=/lib/llvm-18/bin/llvm-config
llvm-config --cxxflags --ldflags --system-libs --libs core
https://github.com/ziglang/zig/issues/419
下载zig源码编译
在build目录构建,方便删除
git clone https://mirror.ghproxy.com/https://github.com/ziglang/zig.git
cd zig
mkdir build
cd build
cmake ..  -DCMAKE_PREFIX_PATH=/usr/lib/llvm-18  -DZIG_STATIC_LLVM=ON
make
https://github.com/ziglang/zig/wiki/Building-Zig-From-Source
以上步骤为了验证是否能正常打包。
构建debian包
准备环境
sudo apt install dh-make
制作debian文件
生成debian目录
#移除编译build目录,否则--createorig参数创建源码包会包含这些
rm -rf build

#获取最新tag信息,用于作为debian版本
ver=$(git describe --tags --abbrev=0)
git checkout $ver
dh_make  -p zig_$ver  -s -y --createorig
rm -f debian/*.ex
编辑debian内的文件,关键是添加Build-Depends,方便apt build-dep .自动下载打包依赖。
如果有修改,需要dch -i命令添加changelog
debian/control文件内容。
Source: zig
Section: devel
Priority: optional
Maintainer: errorcode7 <errorcode7@qq.com>
Build-Depends: debhelper (>= 11),dh-make,dpkg-dev,build-essential,cmake,clang-18,libclang-18-dev,libclang-cpp18-dev,llvm-18,llvm-18-dev,lld-18,liblld-18-dev,libpolly-18-dev,libllvm18
Standards-Version: 4.1.3
Homepage: https://ziglang.org/
Vcs-Git: https://github.com/ziglang/zig

Package: zig
Architecture: any
Depends: ${shlibs:Depends}, ${misc:Depends}
Description: Zig is a general-purpose programming language and toolchain for maintaining robust, optimal and reusable software.
https://github.com/errorcode7/zig/tree/master/debian
dpkg-buildpackage打包
# 因为有Cmake文件,直接构建即可
rm -rf  .zig-cache/
dpkg-buildpackage -uc -us -tc
可能会提示gpg签名失败,不要紧,已经打包好了。
dpkg -c ../zig_*.deb